Start your free 3-day trial β€” no credit card required, full access included

VAC Stent

Reading time readingtime 18:03 min.
  1. Design of the VAC stents

    Design of the VAC stents 1
    Design of the VAC stents 2

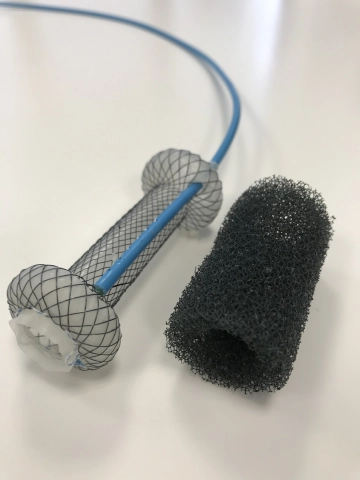
    The VAC stent combines elements of both a self-expanding metal stent and endoscopic vacuum therapy in a single instrument.

    The nitinol stent is fully covered with a silicone membrane that is impermeable to liquids and gases and is encased by a polyurethane sponge cylinder.

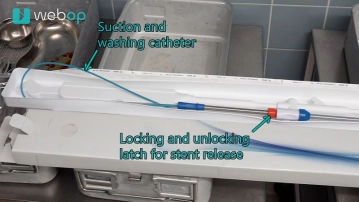
    A 2.5 m long polyurethane suction catheter with a diameter of 10 French and a removable Luer-Lock connector is embedded in the open-pore sponge. After transnasal redirection, it connects to an adjustable vacuum pump. The ends of the covered stent are in contact with the intestinal wall and seal the lumen.

    The metal stent has a body length of 50 mm and an expanded diameter of 14 mm, as well as two dumbbell-shaped ends, each 10 mm long, expanding to a diameter of 30 mm. This results in a total stent length of 70 mm. The stent body contains six radiopaque titanium markers to assist positioning under fluoroscopic control. The sponge is attached to the stent body with a suture thread.

    The stent is delivered pre-assembled on a 1 m long over-the-wire introduction system.

    The Esophagus-VACStent® is available in only one size and is CE-certified (Conformité Européenne).

  2. Preparation

    Video
    Preparation
    Soundsettings

    The VACStent® treatment set is an introducer device with an outer diameter of 42 French (14 mm). It contains the self-expanding metal stent enveloped with a sponge, mounted on an inner catheter and held together by an outer tube.

    Before placement, both the blue suction tube and the stent lumen are each flushed with 20 ml of physiological saline solution.

    This arrangement includes a soft transparent cap at the end of the system, into which the opening for the guidewire is integrated. After removing the metal core of the inner catheter, the channel for the guidewire is also flushed with 20 ml of saline solution.

  3. Endoscopic diagnostics / Introduction of the guidewire

    Video
    Soundsettings

    In the presented case, it involves the prophylactic use of the VAC stent with intraoperative placement after subtotal esophagectomy. As the first step, a transoral endoscopy is performed to determine the exact location of the anastomosis.

    Note: In the event of an anastomotic leakage, the stent position is determined according to the following criteria:
    (1) Adequate coverage of the leakage by the polyurethane foam and
    (2) a minimum distance of 1 cm from both stent ends to the leakage.

    Under endoscopic guidance, a 0.035-inch guidewire is inserted into the gastric conduit.

  4. VAC stent placement and release

    Video
    VAC stent placement and release
    Soundsettings

    Now the stent placement is performed according to the procedure for a standard esophageal SEMS.

    The end of the guidewire is threaded through the olive-shaped opening of the inner catheter, allowing controlled advancement of the prepared stent. While the guidewire remains securely fixed, the stent is advanced transorally to the previously determined position and visually checked before final release.

    Note 1: The positioning and release can be monitored either with fluoroscopy or more simply with a small endoscope introduced parallel to the loaded stent. If optical control is performed, the stent position is determined based on the measured distance from the anastomosis or leakage to the incisors, while the proximal release of the sponge is visually observed.

    In principle, the VAC stent can also be inserted and changed without radiological fluoroscopy, for example, in an intensive care unit.

    Note 2: Since it is a distal release system, it is advantageous to place the stent slightly further distally. A stent that has already been released can be more easily retracted than advanced afterward if it ends too proximally.

    Note 3: Precise intraoperative placement in preventive cases is facilitated by the additional digital control of the surgeon.

    After positioning, the stent is released distally by retracting the outer sheath. To do this, the orange cap is loosened. Subsequently, the outer tube is pushed back to the end of the insertion system, which may initially feel somewhat resistant.

    After release, the stent expands into a dumbbell-shaped structure with an inner diameter of 14 mm. The flange-shaped ends of the stent have a lumen of 30 mm and seal the sponge against the intestinal lumen, enabling circular vacuum therapy over the entire length of the sponge cylinder.

  5. Removal of the introduction system

    Video
    Soundsettings

    Once the stent has been released, the introduction system and the guide wire can be removed under endoscopic control, ensuring that the blue suction catheter remains in place. This catheter should be fixed at the mouth once the system has been passed by it.

    Subsequently, the endoscope is reintroduced to verify the final position and expansion of the VAC stent.

    Note: The free passage through the VAC stent can be checked endoscopically in principle. If necessary, the position of the distal end of the stent can additionally be controlled by inversion.

  6. Transnasal catheter drainage

    Video
    Soundsettings

    The suction catheter is redirected retrogradely through the throat into the nose with the help of a suction catheter introduced through the nose, in order to be able to guide it out here and fix it.

  7. Connection to the vacuum pump

    Video
    Connection to the vacuum pump
    Soundsettings

    The suction catheter is connected to a vacuum pump via a plastic Y-adapter, which allows easy docking to most clinically available vacuum pumps from various manufacturers.

    Currently, there are no strict guidelines regarding the vacuum pressure to be applied. The manufacturer recommends initially setting the pump to 125 mmHg for the first 12 – 24 hours to facilitate tissue adaptation, followed by a reduction to 75 mmHg. Available studies have used continuous suction therapy with a vacuum pressure range of 65 to 125 mmHg. The vacuum mode should be set to continuous operation.

    Note 1: In the example presented here with a fresh anastomosis, a vacuum pressure of 85 mmHg is primarily recommended.

    Note 2: Continuous secretion suction and the fixation of the VAC stent to the intestinal wall are also possible in principle with a vacuum pressure of up to 50 mmHg.

  8. Removal of the VAC stent

    Video
    Soundsettings

    After 5 – 7 days, the VAC stent should be removed or changed. To facilitate the removal process, the vacuum pump is turned off 4 – 6 hours before the procedure. First, the blue suction catheter is disconnected from the Y-adapter and the nasal plasters are removed.
    Then, the sponge is flushed retrogradely over the suction catheter with at least 40 ml of 0.9% NaCl solution. Flushing the sponge with saline can facilitate its detachment from the esophageal wall.

    Next, the endoscope is introduced and the stent, along with the sponge, is carefully detached from the mucosa by guiding the endoscope in a downward motion on all sides between the VAC stent and the mucosa.

    Note: A conically shaped attachment cap for the endoscope can help simplify the procedure.

    Finally, the retrieval loops attached to the proximal end of the stent are grasped with an endoscopic grasping forceps and the system is removed by simultaneous traction on the suction catheter. After removal, the anastomosis or defect site is inspected to assess whether a new VAC stent is required.

    Note: If there is uncertainty about the integrity of the anastomosis or closure of the defect, a new VAC stent can be placed. Alternatively, a CT scan with water-soluble oral contrast is possible.

to top