
-
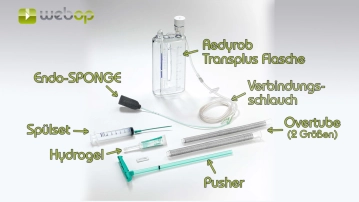
Endo-SPONGE® – Set
![Endo-SPONGE® – Set]()
Soundsettings -
Initial Findings
![Initial Findings]()
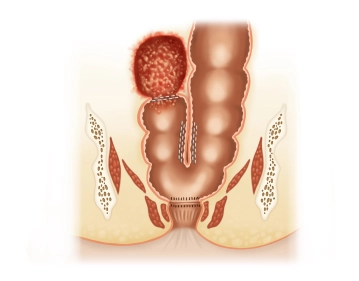
Soundsettings The following initial situation is present:
There is a colon J-pouch with a coloanal pouch anastomosis. At the end of the blind-ending pouch limb, there is a large wound cavity covered with fibrinous debris due to an anastomotic leak. -
Removal of the Sponge
![Removal of the Sponge]()
Soundsettings The finding presented in step 1 had been treated with an Endo-SPONGE®, which is now to be changed. First, the position of the sponge is checked endoscopically. Then, the system is disconnected from the vacuum by clamping the drainage tube and turning the suction to zero. Now, the drainage tube is disconnected at the Y-piece. After opening the application set, the syringe and dilator are removed to flush the sponge. The dilator is inserted into the tube and the syringe is attached. By instilling physiological saline solution or, as in the example, a defoaming liquid, here sab simplex®, the sponge is flushed and removed.

The endoscope is introduced and the wound cavity is inspected. At the fundus of the wound cavity, a
Activate now and continue learning straight away.
Single Access
Activation of this course for 3 days.
Most popular offer
webop - Savings Flex
Combine our learning modules flexibly and save up to 50%.
US$85.05/ yearly payment
general and visceral surgery
Unlock all courses in this module.
US$170.10 / yearly payment
Webop is committed to education. That's why we offer all our content at a fair student rate.