
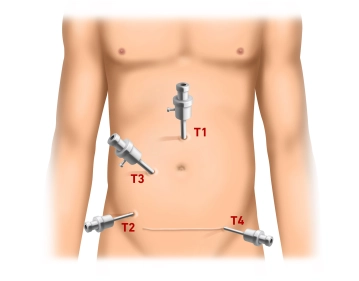
The procedure starts with a minilaparotomy for the camera trocar (T1, 10mm) about 3cm cephalad of the navel. After inserting the trocar, establish pressure-controlled pneumoperitoneum up to 13mm Hg and inspect the abdominal cavity for possible adhesions (e.g., after abdominal hysterectomy via Pfannenstiel incision). Successively introduce the working trocars under laparoscopic view: T2 (5mm) right lower quadrant at the level of the anterior superior iliac spine, T3 (10mm) roughly centered on a slightly curved line connecting T1 and T2. Finally insert T4 (5mm) in the left lower quadrant suprasymphyseally in the course of the subsequent Pfannenstiel incision.
-
Pneumoperitoneum and trocar positioning
![Pneumoperitoneum and trocar positioning]()
Soundsettings -
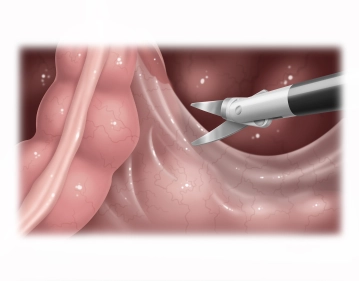
Opening the right pelvic peritoneum
![Opening the right pelvic peritoneum]()
Soundsettings Tilt the operating table to Trendelenburg, and with two atraumatic grasping forceps pull the greater omentum and small intestine into the upper quadrants or right middle abdomen. Pull the sigmoid colon (the video demonstrates a quite elongated sigmoid) to the left, thereby putting traction on the rectum and lifting it superiorly. With bipolar scissors (optionally: LigaSure® or BowaNightKnife®) open the right pararectal peritoneum at the promontory, identify the right ureter and iliac vessels, and carry the incision inferiorly along the peritoneal reflection. Open the posterior fascial space between the parietal pelvic fascia (Waldeyer fascia) and mesorectum as much as possible.
Note
- Identify the ureter before dissection is started, but it is not necessary to dissect it free or encircle it with a tape.
- The lateral support of the descending colon should be left intact to prevent later descent into the lesser pelvis.
-
Mobilizing the posterior rectum
-
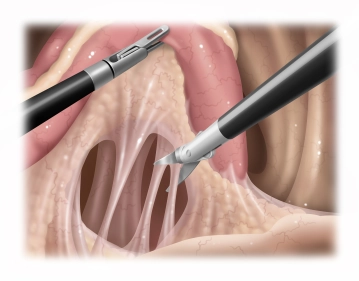
Mobilizing the rectum laterally and anteriorly
![Mobilizing the rectum laterally and anteriorly]()
Soundsettings The incision of the anterior peritoneal reflection and subsequent dissection of the rectum in the anterior fascial space between the posterior vaginal wall and anterior rectal wall, while respecting the Denonvillier fascia, is facilitated by inserting a swab into the vaginal stump (previous hysterectomy). Mobilizing the rectum 360° (laterally and posteriorly down to the pelvic floor) allows it to be pulled far cephalad.
Note
- In the case shown, the prerectal peritoneum is incised and the rectum also dissected anteriorly down to the pelvic floor, thereby achieving the maximum rectal lengthening possible.
- It is not mandatory to dissect the anterior fascial space between the posterior vaginal wall and anterior rectal wall, since dissection in the ballooned Douglas pouch may injure the vegetative nerve fibers. Sometimes only the anterior peritoneum needs to be incised to ensure enough lengthening of the rectum.
- A number of studies demonstrate that sparing the preservation of the lateral stalks improves the postoperative functional outcome, but at the cost of increasing recurrence.
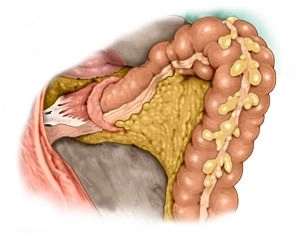
Dividing the superior rectum and dissecting the mesosigmoid
It appears that the sigmoid and rectum has been mobilized enough. Since the hypermobile elongated s
It appears that the sigmoid and rectum has been mobilized enough. Since the hypermobile elongated s
Activate now and continue learning straight away.
Single Access
Activation of this course for 3 days.
US$9.30
inclusive VAT
Most popular offer
webop - Savings Flex
Combine our learning modules flexibly and save up to 50%.
from US$7.19 / module
US$86.33/ yearly payment
general and visceral surgery
Unlock all courses in this module.
US$14.38
/ month
US$172.70 / yearly payment