A small skin incision is made at the lower edge of the left costal arch near the xiphoid. Through this, the Veress needle is introduced, and the pneumoperitoneum is established. The pressure plateau is limited to 12mmHg.
Alternatively, the Veress needle can be introduced through an approximately 1 cm long periumbilical skin incision, and the pneumoperitoneum established through this, or the primary trocar access with the establishment of the pneumoperitoneum in an open technique can be chosen.
-
Creation of the capnoperitoneum
![Creation of the capnoperitoneum]()
Soundsettings -
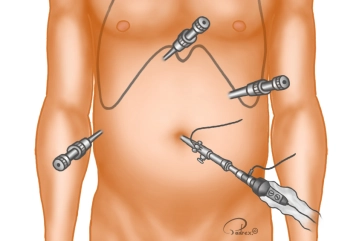
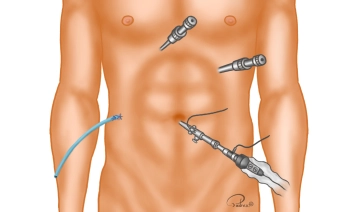
Trocar positioning
![Trocar positioning]()
Soundsettings The channel for the optical trocar (10 mm) is bluntly pre-prepared with closed scissors after a small incision in the navel before its placement. The patient is placed in the anti-Trendelenburg position and the table is tilted slightly to the left, resulting in better exposure of Calot's triangle. Subsequently, the abdominal cavity is inspected. Then, under direct vision, the three additional trocars are placed in the following order:
Subxiphoidal right of the midline 5 mm working trocar (T2), left medioclavicular (above the navel) 10 mm working trocar (T3), right anterior axillary line (below the costal margin) 5 mm working trocar (T4)Tip: To avoid cosmetically noticeable 10 mm incisions, the umbilical incision can be made directly in the navel area and the trocar in the left mid-abdomen can be reduced to 5 mm when using a 5 mm camera.
-
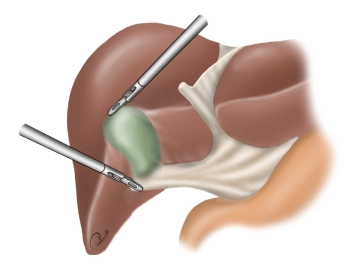
Exposure of the gallbladder
![Exposure of the gallbladder]()
Soundsettings The gallbladder is grasped at the fundus (grasping forceps over T2) and luxated cranially over the liver. With a second grasping forceps (over T4), the infundibulum is grasped and pulled laterally. This stretches the Calot's triangle.
Note: In the case presented here, there is an acute cholecystitis with a significantly thickened, partially hemorrhagic wall and beginning inflammatory pannus formation in Calot's triangle.
-
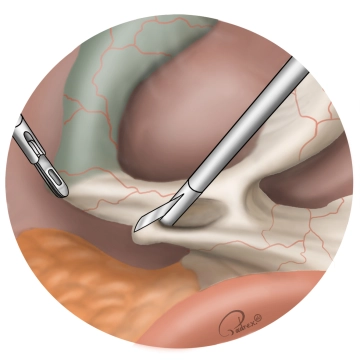
Preparation of Calot's Triangle
![Preparation of Calot's Triangle]()
Soundsettings With scissors introduced over T3, the peritoneal covering in Calot's triangle is sharply incised (not shown here) and then dissection is begun partly bluntly and partly with the hook.
-
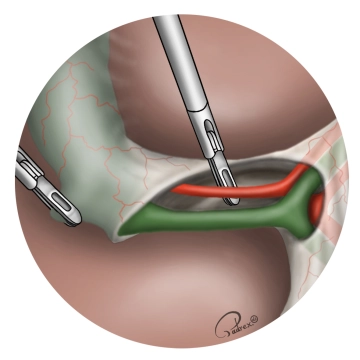
Visualization of the cystic duct and the cystic artery
![Visualization of the cystic duct and the cystic artery]()
Soundsettings After blunt dissection of the cystic duct, its course (from the infundibulum of the gallbladder to the confluence with the common bile duct) is identified. It should be exposed for at least 1 cm and undermined.
The cystic artery is also bluntly dissected. Attention must be paid to variations in its course (very common), especially to avoid confusion with the right hepatic artery!Important: If the structures cannot be clearly identified or if there is suspicion of common bile duct stones, an intraoperative cholangiography should be performed.
Tip: During cholangiography, the distal common bile duct can be temporarily compressed with a grasping forceps, which allows for very good contrast of the biliary system.
-
Clipping of the cystic artery and transection
![Clipping of the cystic artery and transection]()
Soundsettings The cystic artery is closed with 2 proximal/central clips and 1 distal/peripheral clip (in the example shown, three titanium clips) and is transected with scissors between the distal and the two proximal clips. Subsequently, further dissection is performed up to the liver parenchyma. Care must be taken for an occasionally present dorsal arterial vessel supplying the posterior wall of the gallbladder. If present, this vessel must also be transected.
-
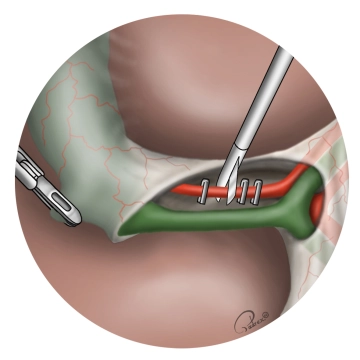
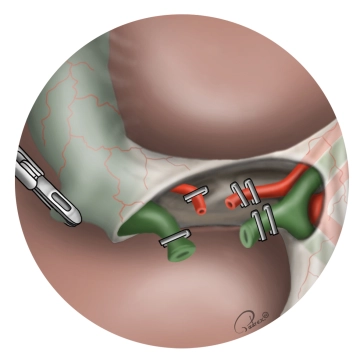
Clipping of the cystic duct and transection
![Clipping of the cystic duct and transection]()
Soundsettings The cystic duct is closed with 2 proximal/central clips and 1 distal/peripheral clip (in the example shown with three Lapro-Clips). The cystic duct is transected with scissors between the distal and the two proximal clips.
Note: As illustrated in the graphic, the use of titanium clips is also legitimate. The Lapro-Clip has the advantage of being absorbable and providing secure fixation.
-
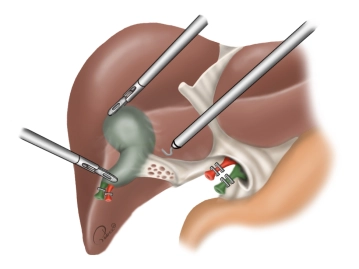
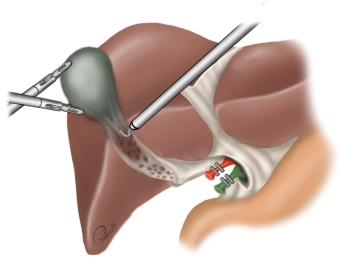
Retrograde mobilization of the gallbladder
![Retrograde mobilization of the gallbladder]()
Soundsettings The gallbladder is held under slight traction cranially and is dissected from the liver bed using the electrocautery hook, starting near the liver at the infundibulum. Hemostasis should be ensured, particularly to identify aberrant additional bile ducts.
-
Hemostasis of the gallbladder bed
![Hemostasis of the gallbladder bed]()
Soundsettings Smaller bleedings are electrically coagulated, larger bleedings and aberrant bile ducts are clipped. Once complete hemostasis is achieved, the last connective tissue strand is severed under coagulation.
Tip: Before the complete detachment of the gallbladder, it can be used to optimally expose the liver bed for hemostasis.
-
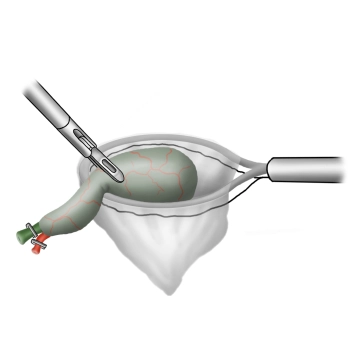
Extraction of the gallbladder
![Extraction of the gallbladder]()
Soundsettings After repositioning the camera from T1 to T3, the retrieval bag is introduced through the periumbilical trocar. The gallbladder is placed into the retrieval bag using the grasping forceps. The retrieval bag is closed and pulled into the trocar. The umbilical fascial incision is extended by approximately 1 cm along the trocar, and the gallbladder is removed in toto.
Tip: Especially after intraoperative gallbladder perforation or in cases of inflammatory changes, the right upper abdomen should be thoroughly irrigated.
-
Placement of the drainage
![Placement of the drainage]()
Soundsettings If there is an increased risk of postoperative bleeding, an infected cavity, or a bile leak, a drainage should be introduced through T4 and placed subhepatically.
Tip: A grasping forceps can be introduced through the subxiphoid trocar and passed through T4 to the outside to grasp the tip of the drainage and place it subhepatically through the trocar.
-
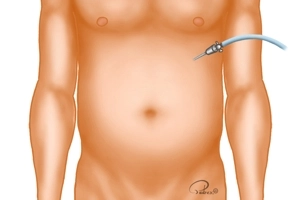
Suture closure
![Suture closure]()
Soundsettings A fascial closure of the periumbilical mini-laparotomy is performed with interrupted sutures under direct visual control from intra-abdominally. Subsequently, the peritoneal cavity is inspected again to check the surgical area for hemostasis. Then, the capnoperitoneum is released, and the three remaining trocars are removed. The 10 mm trocar incision in the left mid-abdomen is closed with a fascial suture. Subsequently, the skin is sutured.
Tip: In cases of obese abdominal walls, a trocar fascial closure system (surgical suture catcher) can be helpful.