Inguinal hernia repair using TEP technique

Reading time readingtime 25:05 min.
  1. Access to the preperitoneal space

    Video
    Access to the preperitoneal space

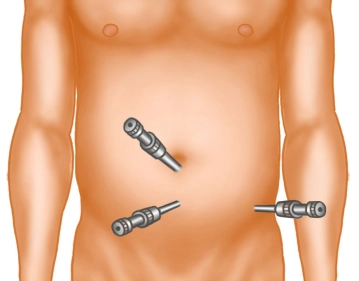
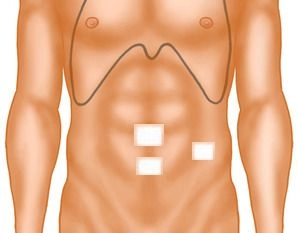
    1 cm long skin incision below the navel. Separate the adipose tissue with Langenbeck hooks and expose the fascia or anterior rectus sheath. This is incised with the scalpel on the side to be treated or, in the case of a bilateral hernia as in the example, on the side of the larger hernia, paramedian over a length of approximately 1 cm. The medial edge of the fascia is grasped with a sharp clamp. Using a Langenbeck hook, the medial rectus muscle is lifted anteriorly and laterally, thus exposing the posterior layer of the rectus sheath.

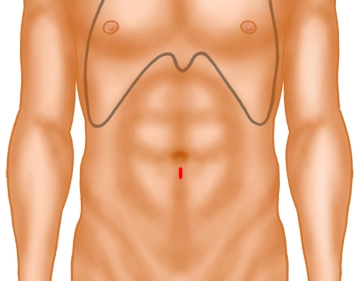
    Tip: With a precisely median incision of the fascia, one enters directly into the abdomen and not into the rectus sheath. The fascia must then be closed again and incised further laterally!

  2. Insertion of the trocars

    Video
    Insertion of the trocars

    A long preparation swab is advanced on the posterior leaf towards the symphysis and the preperitoneal space is bluntly dissected up to the retropubic area. Then, a 10mm trocar is inserted and CO2 gas is applied with pressures between 10 – 15 mmHg. The camera optics are introduced. Under visual control, a 5mm trocar is now inserted in the midline exactly between the navel and the symphysis.

    Tip: Before inserting the 5mm trocar, pay attention to the epigastric vessels, which are usually visible. Use trocars with a locking mechanism, as they otherwise slip and significantly complicate the preparation!

  3. Preparation of the preperitoneal space

    Video
    Preparation of the preperitoneal space

    Through the 5mm trocar, the extraperitoneal space is now mainly bluntly opened with scissors. To do this, begin retrosymphysially and push the tissue from the back of the pubic bone towards the bladder in a ventral to dorsal motion. Small crossing vessels can be coagulated. The retropubic space must be opened below the symphysis.

    Subsequently, dissection is performed laterally in the same manner until the lateral boundary of the rectus sheath appears. This is now incised in tiny steps with scissors until the level of the anterior superior iliac spine is reached. Approximately 3cm above the spine, the second 5mm trocar is inserted under vision.

    Tip: The lateral edge of the rectus sheath should be sharply incised as far ventrally as possible, otherwise, you may enter the abdomen directly!

  4. Preparation of the left side in indirect hernia sac

    Video
    Preparation of the left side in indirect hernia sac

    From now on, use a dissector and fine grasping forceps through the two 5mm trocars. By applying traction and countertraction, a thorough blunt dissection of the preperitoneal space is achieved. A small indirect hernia sac is found lateral to the epigastric vessels within the spermatic cord.
    The hernia sac is bluntly separated from the spermatic cord structures by traction and countertraction and, together with the peritoneum, pushed dorsally as far as possible. Preperitoneal lipomas can be managed in the same way. 

    Note 1: A lipoma in the inguinal canal must be dissected out in any case to prevent chronic pain.

    Note 2: The hernia sac should be dissected out of the inguinal canal as completely as possible to avoid a postoperative seroma.

    Note 2: Lateral to the spermatic cord, there are many lymph nodes. In an unnecessary dissection here by the inexperienced, it can lead to bleeding that is difficult to control! 

  5. Preparation of the right side with direct hernia sac

    Video
    Preparation of the right side with direct hernia sac

    Now preparation on the right side, revealing a direct hernia. The hernia sac is bluntly pulled out of the hernia orifice with both instruments and separated from the transversalis fascia. Further dissection laterally includes the visualization of the epigastric vessels and the ileopubic tract. A complete parietalization of the spermatic cord is performed, as well as exposure of the fascia over the psoas muscle.

    Note 1: A peritoneal leak (about 50% of cases) is not an actual complication. Depending on the location, openings over 1-2 cm are sutured.

    Note 2: In the case of a large medial hernia (EHS classification 3), defect reduction should be performed, otherwise the cavity fills with serous fluid and a pseudo-recurrence with bulging in the groin occurs as before the operation. The stretched transversalis fascia is pulled inward and fixed to the Cooper's ligament with a suture. This also creates a better bed for mesh placement.

    Note 3: Since the preparation is very close to the femoral vessels, attention must be paid to venous side branches, which, if injured, bleed profusely and require a lot of patience and experience in hemostasis!

  6. Placement of the meshes

    Video
    Placement of the meshes

    After complete dissection, the first mesh (10 x 15 cm) is prepared for the right side. First, the corners are rounded with scissors, then it is tightly rolled, grasped at one end with the dissector, and then blindly introduced through the 10mm camera trocar. The mesh is unfolded and placed so that the hernia defect is covered in all directions with at least 3 cm overlap. Additionally, all potential hernia defects (medial, lateral, femoral) should be covered with the mesh. When placing dorsally, it is important to ensure that the hernia sac and peritoneum, as well as any preperitoneal lipoma present, lie in front of and not behind the mesh.

    Since bilateral hernias are present, a second mesh is introduced in the same manner and placed on the left side with appropriate overlap in the middle. Optionally, a Redon drain can be inserted. Under visual control, the gas is then slowly released, observing how the peritoneum properly lays in front of the mesh.

    Note 1: In TEP, fixation of the mesh or meshes can be omitted except for large medial defects (M III according to EHS classification).

    Note 2: When releasing the CO2 gas, care must be taken to keep the lower edge of the mesh (possibly with instruments) in position until the expanding peritoneum takes over this task. Otherwise, there is a risk that it will be lifted and folded like a sandwich.

  7. Closure of the incisions

    Video
    Closure of the incisions

    After closing the anterior rectus sheath, the skin incisions are closed with interrupted sutures – optionally with absorbable monofilament thread.