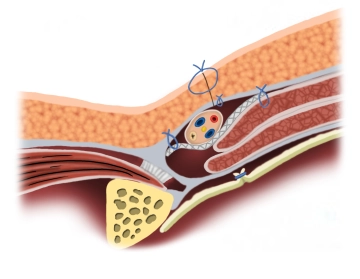
The mesh is implanted interparietally on the internal oblique muscle or the transversalis fascia and dorsal to the external aponeurosis for the reconstruction and stabilization of the posterior wall of the inguinal canal.
-
Principle
![Principle]()
-
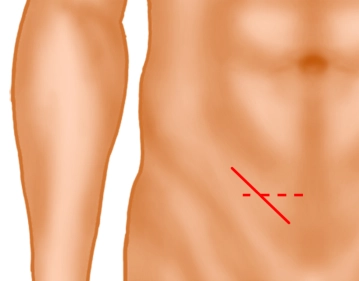
Inguinal skin incision
![Inguinal skin incision]()
Soundsettings A skin incision approximately 5 cm long is made obliquely, 2 fingerbreadths above the inguinal ligament (solid line) or alternatively a transverse skin incision 2 fingerbreadths above the pubic bone. Subsequently, the subcutaneous tissue is incised down to the external oblique aponeurosis. Subcutaneously located superficial epigastric vessels are ligated (not shown).
Note: In very obese patients or very large scrotal hernias, an extension laterally may be necessary.
-
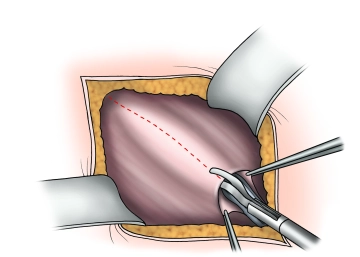
Splitting of the externus aponeurosis
![Splitting of the externus aponeurosis]()
Soundsettings Presentation of the external aponeurosis and the external inguinal ring. Incision of the external aponeurosis along the fiber course starting at the external inguinal ring laterally extending beyond the level of the internal inguinal ring. Caution: Directly beneath the external aponeurosis, the ilioinguinal nerve runs on the spermatic cord!
The fascial edges are clamped, elevated, and the fascia is widely separated from the internal oblique muscle and cremaster muscle, taking care of the hypogastric nerve.
-
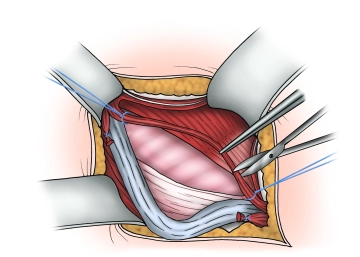
Visualization and looping of the spermatic cord
![Visualization and looping of the spermatic cord]()
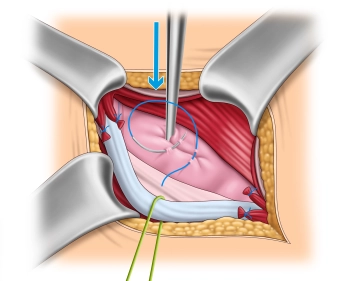
Soundsettings The spermatic cord, possibly together with an indirect hernia sac, is initially carefully prepared and looped at the level of the pubic tubercle and then completely separated from the underlying fascia transversalis or a direct hernia sac.
The cremaster muscle fibers are split longitudinally and the structures of the spermatic cord are identified. Attention must be paid to the course of the nerves and the epigastric vessels.
Note:
- When looping the spermatic cord and preparing the hernia sac, the genital branch of the genitofemoral nerve must be preserved, which extends along the lower edge of the spermatic cord in direct proximity to the external spermatic vein with the cremaster fibers.
- To avoid postoperative neuralgias, the following should be noted: If the genital branch of the genitofemoral nerve, the ilioinguinal nerve, or the hypogastric nerve cannot be preserved, the affected nerves should be resected and the resection ends infiltrated with a local anesthetic.
- Long stretches of nerve exposure and manipulation should be avoided. In case of doubt, it is better to perform a neurectomy than to leave a damaged nerve.
-
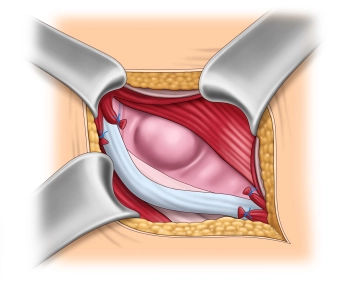
Dissection and identification of the hernia sac
![Dissection and identification of the hernia sac]()
Soundsettings The hernial sac is dissected free up to the hernia gap at the level of the transversalis fascia, preserving the spermatic cord structures. In this example, it is a direct hernia because the hernial sac has developed medial to the epigastric vessels.
-
Management of the hernial sac – Direct hernia
![Management of the hernial sac – Direct hernia]()
Soundsettings Direct Hernia
In the case of a direct hernia, a hernia sac opening is generally not necessary. If the hernia sac is large, it is inverted, and the hernia ring is either encircled with an absorbable Z-suture or alternatively gathered with a continuous absorbable suture.
Note: In the Lichtenstein procedure, the femoral canal is not inspected because the transversalis fascia is not opened.
-
Management of the hernial sac– Indirect hernia
![Management of the hernial sac– Indirect hernia]()
Soundsettings The operation depicted involves a direct inguinal hernia.
In this step, we also want to describe the management of an indirect hernia using the Lichtenstein technique. The images were taken from another operation.
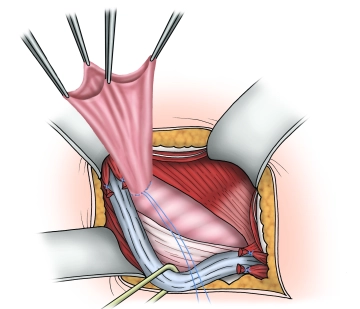
After complete exposure of the internal inguinal ring, the hernia sac is spread open and possibly incised. Then, the base of the hernia sac is closed with a purse-string suture, and the protruding hernia sac is resected. If a preperitoneal lipoma is present, it is dissected down to the base at the level of the internal inguinal ring and removed over a ligature.
Tip: After resecting the protruding hernia sac, before shortening the holding sutures, they should first be held loosely, and the resection surface of the hernia sac stump should be checked for hemostasis. If further hemostasis is required, the stump can be easily pulled forward using the holding sutures. Finally, the holding sutures are shortened, and the stump is either sunk or retracts spontaneously.
Note: In the original Lichtenstein technique, the hernia sac was not removed but was generally invaginated. However, data show a lower recurrence rate with the removal of the hernia sac, so this approach is favored.
-
Adjusting and trimming the mesh
![Adjusting and trimming the mesh]()
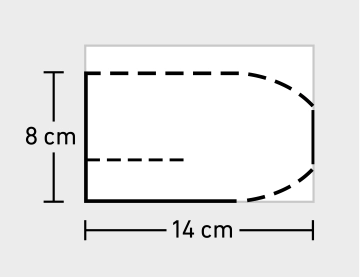
Soundsettings Reconstruction with a large-pore non-resorbable synthetic mesh (polypropylene, polyester, or PVDF).
Starting from a size of 10 x 15 cm, cut an 8 x 14 cm mesh with a lateral slit and beveled ends (if not already prefabricated as a so-called Lichtenstein mesh).
-
Mesh fixation on the inguinal ligament
![Mesh fixation on the inguinal ligament]()
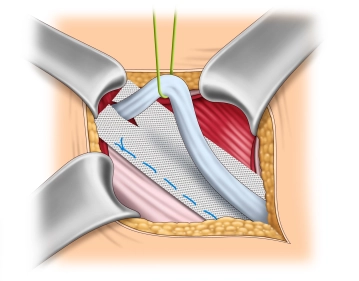
Soundsettings The fixation of the mesh at the lower edge of the inguinal ligament begins medially at the pubic tubercle. It is important that the pubic tubercle is covered with at least 2 cm of mesh medially, as this is where most recurrences occur. The lower edge of the mesh is sewn to the inguinal ligament with a non-absorbable continuous suture (monofil 2-0) up to about 2 cm lateral to the internal inguinal ring. It is important to avoid leaving gaps at the inguinal ligament due to the risk of recurrence.
Note 1: The fixation should not extend to the periosteum. Beware of painful periostitis!
Note 2: Mesh fixation is also possible without sutures in principle. Self-adhesive meshes and the bonding of the mesh using fibrin or cyanoacrylate are used. However, studies do not show a reduction in postoperative chronic pain.
-
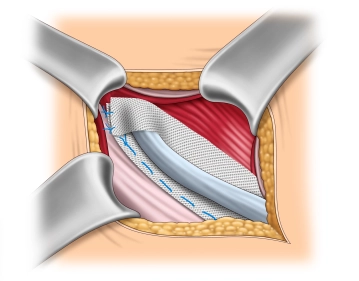
Reconstruction of the internal inguinal ring
![Reconstruction of the internal inguinal ring]()
Soundsettings The upper lip of the mesh is folded over the spermatic cord at the internal inguinal ring onto the lower lip. Initially, the two lips are sutured together (2-0, non-absorbable) and then fixed to the inguinal ligament with one or two additional sutures of the same suture material.
Note: Precise calibration of the spermatic cord passage is of great importance to avoid chronic pain and recurrence. The newly formed internal inguinal ring should be passable for a Kocher clamp, but not for the index finger.
-
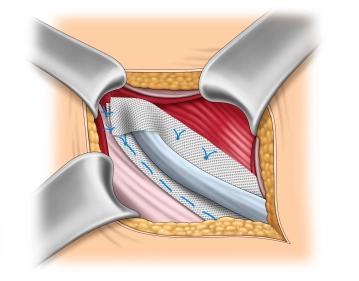
Mesh fixation on the internal oblique muscle
![Mesh fixation on the internal oblique muscle]()
Soundsettings The upper edge of the mesh is fixed to the internal oblique muscle of the abdomen with 2 to 3 absorbable single button sutures (suture size 2-0), which are performed as air knots to avoid accidental entanglement of nerve fibers.
-
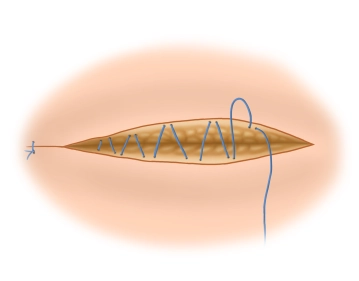
Closure of the external aponeurosis
![Closure of the external aponeurosis]()
Soundsettings The external aponeurosis is closed with a continuous absorbable suture (braided, absorbable, 2-0), thereby reconstructing the anterior wall of the inguinal canal. Depending on the situation, a Redon drain may be inserted, especially in "bloody" operations and patients under therapeutic anticoagulation.
-
Ending the operation
![Ending the operation]()
Soundsettings Subcutaneous suture, continuous intradermal skin suture with absorbable thread.