Start your free 3-day trial — no credit card required, full access included

Cephalic pancreatoduodenectomy with Blumgart anastomosis and biliopancreatic separation

Reading time readingtime 30:08 min.
  1. Laparotomy

    Video
    Laparotomy
    Soundsettings

    Surgical access is gained via a standard transverse incision. Follow this with inspection and palpation of the entire abdomen to rule out distant metastases and signs of local unresectability.

    After inserting a wound edge protector mount the cable winch retractor system.

    Note:

    In patients with a sharply angled costal arch perform a midline laparotomy.

  2. Opening the lesser sac

    Video
    Opening the lesser sac
    Soundsettings

    Enter the omental bursa by detaching the omentum from the right colic flexure to the left third of the transverse colon. Now that the pancreas can be examined in detail from the left too, look for any infiltration of the stomach or postpyloric duodenum. Take down any adhesions between the pancreas and posterior gastric wall.

    Note:

    The duodenum should be preserved over a distance of 2–3 cm. If this is not possible, perform partial gastric resection.

  3. Kocher maneuver

    Video
    Kocher maneuver
    Soundsettings

    First, detach the right colic flexure from the anterior aspect of the duodenum and pancreatic head. Then mobilize the duodenum with the Kocher maneuver. Transpose the mobilized colon section to the left, and after incising along the outer margin of the duodenum release the duodenum together with the head of the pancreas from its retroperitoneal attachments. Continue mobilizing the head of the pancreas across the aortic plane up to the ligament of Treitz until the pancreatic head can be completely enclosed and palpated from posterior.

    Next, palpate the mobilized pancreatic head to rule out retroperitoneal infiltration and also palpate the lymphatic pathways and large vessels.

  4. Cholecystectomy

    Video
    Cholecystectomy
    Soundsettings

    Start the resection phase with cholecystectomy:  Grasp the gallbladder and perform antegrade subserous dissection from the liver bed using bipolar forceps, expose the bile duct and cystic artery, which for now are left attached to the specimen later resected.

    Note:

    To prevent ascending cholangitis following bilioenteric anastomosis, cholecystectomy is mandatory for functional reasons when performing pancreatic head resection.

  5. Dissecting the hepatoduodenal ligament and transecting the right gastric artery

    Video
    Dissecting the hepatoduodenal ligament and transecting the right gastric artery
    Soundsettings

    Dissection of the hepatoduodenal ligament includes exposure of the common hepatic artery, proper hepatic artery, and gastroduodenal artery, portal vein, and common bile duct.

    The case presented here has an anatomical variant of the blood supply to the liver. An atypical right hepatic artery from the superior mesenteric artery crosses the common bile duct posteriorly.

    In this case, perform the lymphadenectomy along the left hepatic artery in a central direction towards the celiac trunk, exposing the bifurcation of the gastroduodenal artery.

    Begin mobilizing the pylorus by dividing the right gastric artery between ligatures.

    Before this, complete ligament dissection by exposing the suprapancreatic portal vein until posterior to the pancreas.

  6. Transecting the postpyloric duodenum and gastroduodenal artery

    Video
    Soundsettings

    Now expose and transect the duodenum with a linear stapler 3 cm distal to the pylorus.  Next, transect the gastroepiploic arcade and then the gastroduodenal artery. Secure the central stump with a suture ligature.

    Tip:

    Before transecting the gastroduodenal artery, first clamp it temporarily to rule out any significant stenosis of the celiac trunk.

  7. Transecting and skeletonizing the first jejunal loop

    Video
    Transecting and skeletonizing the first jejunal loop
    Soundsettings

    After locating the first jejunal loop distal to the ligament of Treitz, identify the arterial and venous arcades and then transect the jejunum with the linear stapler. Next, divide the mesentery of the proximal limb of the jejunal loop close to the intestine up to the duodenojejunal transition at the level of the ligament of Treitz.

    Note:

    In the case presented here, the mesentery is dissected between ligatures; this can be done much easier and faster using a diathermy or ultrasonic sealing instrument.

  8. Pulling through the jejunal limb / dissecting the superior mesenteric vein

    Video
    Soundsettings

    Transpose the dissected jejunal loop through an opening in the mesocolon into the upper abdomen. Then identify the mesenteric vein on the inferior aspect of the pancreatic head. Follow the superior mesenteric vein until below the pancreas.

    Note:

    In case of unclear resectability, first dissect the superior mesenteric vein since this is the critical location for best assessing resectability.

  9. Transecting the pancreas and CBD

    Video
    Transecting the pancreas and CBD
    Soundsettings

    Carefully tunnel the pancreas with Overholt dissecting forceps and raise the pancreas slightly off the superior mesenteric vein with a vessel loop. The latter protects the superior mesenteric vein when next transecting the pancreas with a scalpel.  Obtain hemostasis of bleeding vessels on the distal resection surface with suture ligation (4/0 monofilament, delayed absorbable). Then prepare the pancreatic stump for anastomosis.

    Now close off the common bile duct distally with a suture and then transect proximal to the confluence of the cystic duct with the common bile duct.

    Take a swab.  Close the common bile duct temporarily with a bulldog clamp.

    Tip:

    To assure unhindered perfusion, transect the common hepatic bile duct proximal to its confluence with the cystic duct, as close as possible to the hepatic hilum.

  10. Detaching the pancreatic head

    Video
    Detaching the pancreatic head
    Soundsettings

    Completely detach the pancreatic head by transecting the afferent branches of the portal vein.

    This completes the resection phase and the resected specimen is handed over.

    Intraoperative frozen section study of the pancreatic resection margin should confirm tumor-free resection margins. If invasive cancer or high-grade epithelial dysplasia is present at the resection margin, further resection or even total pancreatectomy is indicated.

    Note:

    Ensure meticulous dissection at the posterior retroperitoneal resection margin since this is the region most likely to show advanced tumor invasion (R1).

  11. Sealing the retroperitoneal resection area with HaemoCer PLUS

    Video
    Soundsettings

    Apply hemostatic agent to the retroperitoneal resection surface between the portal vein and vena cava to reduce the risk of secondary bleeding.

    Here, HaemocerPlus, a hemostatic powder, is used.

    For maximum hemostatic effect, it is important that blood clots be carefully removed because the powder particles require direct contact with the tissue.

    Now apply the powder directly to the entire area, ensuring that the margins are also covered. Even coverage is more important than thickness of coverage.

    Apply even pressure to the entire wound for about two minutes with one or two dry pads.

    Then irrigate with physiological saline to loosen the pad(s) and prevent adhesions.

  12. Oversewing and pulling up the jejunal limb retrocolically

    Video
    Soundsettings

    Oversew the distal jejunal limb and then pass it retrocolically through a newly fashioned mesocolic window into right upper abdomen. It should come to rest tension- free anterior to the pancreatic remnant.

  13. Pancreatojejunostomy I (Blumgart-style, posterior wall)

    Video
    Soundsettings

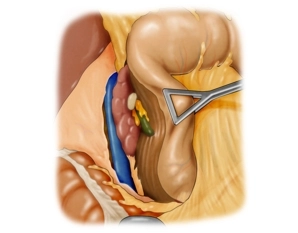
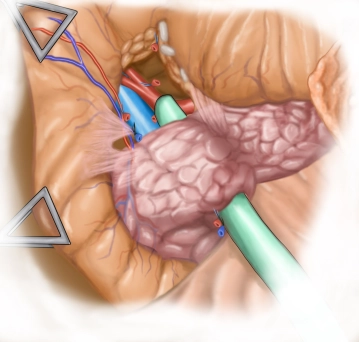
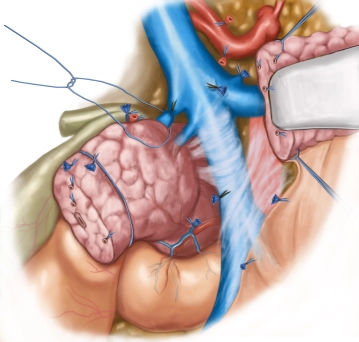
    Fashion the pancreatojejunostomy in two rows with the duct anastomosed end-to-side. To this end, mobilize the pancreas far enough to the left of the superior mesenteric vein and probe the duct. First, at the pancreas preplace double-armed full-thickness interrupted mattress sutures through the jejunal limb serosa.

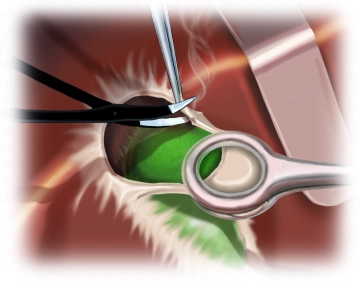
    After punctiform opening of the jejunum, pull up the mucosa with three everting interrupted sutures. First, preplace the inner suture row (duct-to-mucosa) with double-armed sutures. The full-thickness sutures encompass the entire wall, including the pancreatic duct and corresponding jejunum. The suture direction is from the inside out, with the knots later located on the outside. Then tighten the preplaced transpancreatc interrupted sutures, approximating the pancreatic stump to the jejunum. Next, tie the knots of these sutures but do not off the ends of the thread.

    Tying the duct-to-mucosa knots completes suture of the posterior wall.

    Note:

    The main emphasis when fashioning a pancreatic anastomosis should be on tension-free approximation and good perfusion, while avoiding obstruction of the pancreatic duct.

  14. Pancreatojejunostomy II (Blumgart-style, anterior wall)

    Video
    Soundsettings

    Suture the anterior wall in the same way: First fashion the inner row with the duct-to-mucosa sutures and then, with the already preplaced deep pancreatic sutures, grasp the contralateral jejunal serosa so that tying the knots will achieve invagination of the pancreatic stump into the jejunal stump.

  15. Fashioning the Roux-en Y limb

    Video
    Soundsettings

    First, anchor the jejunal limb carrying the pancreatic anastomosis in the mesocolic window.

    In the next step, fashion the end-to-side anastomosis of the common hepatic duct with a second Roux-en-Y jejunal limb (hepatojejunostomy).

    To that effect, first select a jejunal limb under transillumination of the vascular arcades approx. 30 cm distal to the mesocolic window. Transect avascular segments of the mesentery with electrocautery and divide the intersecting vessels between clamps. Transect the bowel with the linear stapler. Oversew the staple line of the efferent limb with invaginating sutures.

    Transpose the efferent jejunal limb antecolically into the upper abdomen, approximating it to the stump of the common hepatic duct.

  16. Bilioenteric anastomosis

    Video
    Soundsettings

    Fashion an antimesenteric punctiform opening in the pulled-up jejunal limb and pull up the mucosa with three everting interrupted sutures. Then fashion the end-to-side anastomosis of the hepatojejunostomy.

    To this end, flare the stump of the common hepatic duct by placing lateral corner sutures (5-0 monofilament, delayed absorbable). Next, preplace the posterior wall sutures for the single-row anastomosis; by carefully tightening the sutures approximate the opened jejunal limb and tie the knots, with the knots always located on the inside. Then preplace the anterior wall sutures and tie, beginning with a corner suture. Here the knots are located on the outside.

  17. Anastomosing the stomach

    Video
    Soundsettings

    Anchor the pulled-up antecolic limb on the transverse colon. Approximately 40 cm distal to the bilioenteric anastomosis, restore the food transit by anastomosing the postpyloric duodenal segment with a two-row end-to-side anastomosis.

    After reopening the duodenal segment, first place two corner sutures (4-0 monofilament, delayed absorbable)which flares the planned anastomosis. With the long limb of one corner suture, fashion the first row of the posterior wall continuous suture line with seromuscular, antimesenteric stitches on the jejunal limb and submucosal stitches on the duodenum.

    After opening the jejunal limb with electrocautery, fashion the second posterior wall suture line with a continuous full-thickness suture. Start at the large curvature with a single corner suture (“outside in /inside out“). Then stitch the suture inside and continue as a lock-stitch at 5 mm intervals. Without knotting this suture then becomes the first row of the anterior wall anastomosis.

    Then fashion the second row of the anterior wall suture line with the long limb of the other corner suture. Finish with an anchor suture on the lesser curvature side to relieve tension from the anastomosis.

  18. Terminolateral jejunojejunostomy (Roux-en-Y)

    Video
    Soundsettings

    Anastomose the biliopancreatic jejunal limb, originating from the pancreas, end-to-side with the alimentary jejunal limb 40 cm distal to the gastrojejunostomy. Approximate both limbs with tied corner sutures (4/0, monofilament, delayed absorbable); follow this by resecting the staple line of the biliopancreatic limb and antimesenteric opening of the alimentary limb with electrocautery.

    Fashion both the anterior and posterior walls with a single-row seromuscular-submucosal continuous suture.  Complete this part of the procedure by closing the mesenteric window with a continuous suture.

  19. Closing the abdominal wall

    Video
    Soundsettings

    After repositioning the mobilized organs, irrigation and checking for hemostasis, place drains at the pancreatic anastomosis inferior to the liver and posterior to the stomach. Then close the layers of the abdominal wall.