Start your free 3-day trial — no credit card required, full access included

Partial Fasciectomy for Dupuytren's Disease

Reading time readingtime 05:24 min.
  1. Planning/Incision

    Video
    Planning/Incision
    Soundsettings

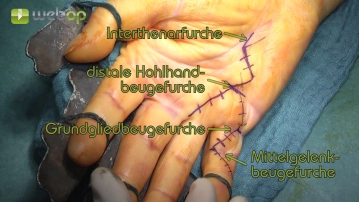
    Anatomical orientation by palpation and marking of anatomical landmarks: 

    Zigzag incision from the distal interthenar crease over the distal palmar crease to the proximal phalangeal crease of the mainly affected finger (here little finger). Brunner's incision in the area of the proximal and middle phalanx. Additional diverging oblique incision over a secondary cord from the distal palmar crease to the proximal phalangeal crease of the ring finger. 

    Sharp transection of the skin.

    Guiding structures

    • Distal palmar crease
    • Proximal phalangeal crease
    • Proximal interphalangeal crease
    • Interthenar crease
    • Main and secondary cord 

    Note

    To avoid future scar contractures, the incision should be planned so that the scar does not lie directly over a flexion crease.
  2. Releasing the Skin from the Dupuytren Cord

    Video
    Soundsettings

    The skin and the subcutaneous tissue are carefully dissected from proximal to distal from the altered aponeurotic tissue. The skin is treated as atraumatically as possible (skin hooks, ring forceps, no tweezers!), to avoid perfusion disorders.

    Caution

    The skin should not be thinned too much, as this can lead to skin necroses. If the cord infiltrates the cutis, resection with skin and skin graft should be considered.

  3. Exposure of the proximal Dupuytren cord

    Video
    Soundsettings

    At the level of the palm, the cord is dissected free from the surroundings and the vascular/nerve bundles are securely identified. Detachment of the cord proximally.

  4. Mobilization of the Dupuytren's cord from proximal to distal

    Video
    Soundsettings

    The altered tissue is detached from the flexor-sided structures such as artery, nerve, and flexor tendon sheath partly bluntly, partly sharply. After removal of the pathological tissue, the extension of the affected joints is checked. If necessary, a joint release (arthrolysis) is required.

  5. Checking the Circulation

    Video
    Soundsettings

    The tourniquet is released, careful hemostasis. Verification of proper perfusion of the fingers and the skin flaps.

  6. Irrigation and Wound Closure

    Video
    Irrigation and Wound Closure
    Soundsettings

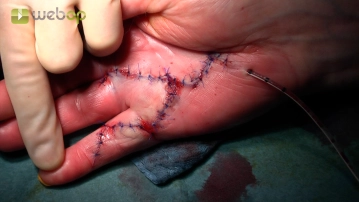
    Careful irrigation of the surgical site e.g. with physiological saline solution and final inspection. If necessary, insertion of a Mini-Redon or an 8-Redon drain. Everting skin suture (single interrupted/continuous/subcuticular, if necessary Omni- or Steri-Strips). Sterile elastic compressive dressing.

to top