Standard bilioenteric anastomosis - general and visceral surgery

You have not purchased a license - paywall is active: to the product selection
  • Principle

    Principle
     

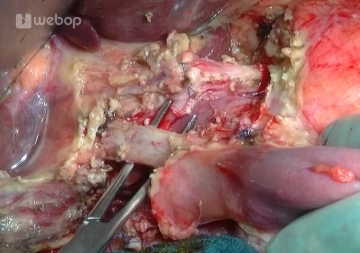
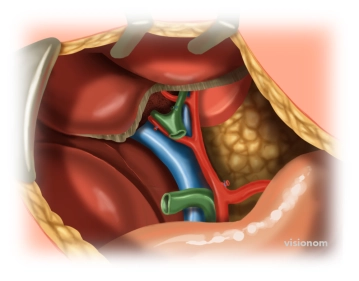
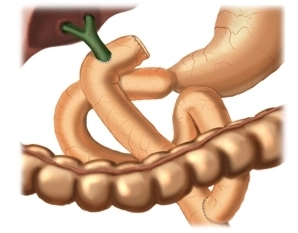
    The gold standard in bilioenteric anastomosis is retrocolic end-to-side Roux-en-Y hepaticojejunostomy with a segment of the proximal jejunum.

    Here, the preferred bilioenteric anastomosis is established proximal to the cystic duct and about 2-3 cm distal to the union of the hepatic ducts.

    • The opening of the anastomosis should be as wide as possible (if the common hepatic duct is too small it may be enlarged with the Hepp-Couinaud technique)
    • The single row of interrupted suture encompassing all layers should be leak-roof from the beginning and
    • precisely adapt the mucosa of the hepatic duct to that of the jejunum.
  • Exploration – exposure of the hepatoduodenal ligament

    Video
     
    Exploration – exposure of the hepatoduodenal ligament
     

    The anastomosis will be explained as part of the Whipple procedure for cancer of the pancreatic head. One modification of the bilioenteric anastomosis (hilar hepatojejunostomy) is found under Hepp-Couinaud technique for bilioenteric anastomosis,

    In the hepatoduodenal ligament expose the proper hepatic artery, portal vein and the CHD / CBD. Free the entire circumference of the duct.

  • Exposing the CBD/CHD

    Video
     
    Paid content (image)

    Once the circumference of the duct has been freed completely, it is divided immediately proximal to the junction of the cystic duct. The duodenal end of the CBD is closed with an absorbable running suture (Vicryl® 3-0) (not shown). The part to be anastomosed is temporarily blocked with bulldog forceps.

    Note: Because of the clinically significant preoperative obstruction of the CBD, it had been decompressed before surgery by a blue drain through a stent.

  • Dissecting the jejunal loop

    Paid content (video)
    Paid content (image)

    A detailed description of the Roux-en-Y technique is found here Gastrointestinal anastomosis, Roux-en-Y esophagojejunostomy

    Free the 2nd jejunal loop. Identify the mesenteric vascular arcades by transillumination and dissect with the Ligasure. Divide the loop at a location with confirmed blood flow. Pull up the descending Roux-en-limb through a window in the mesentery to the right of the middle colic artery. Verify that the mesentery is not twisted. Stitch over the stapled blind end with a running seromuscular suture PDS 5/0.

  • Creating the bilioenteric anastomosis – suturing the posterior wall

    Paid content (video)
    Paid content (image)

    First, freshen the divided margin of the bile duct and place Prole 5/0 stay sutures.

    Incise the jejunal loop on its antimesenteric aspect over the same length as the diameter of the bile duct. Attach the jejunal mucosa to the intestinal wall with four interrupted sutures PDS 6/0, which will prevent it from slipping back. Now place the atraumatic orientation sutures in the middle of the anterior and posterior wall and the corner sutures, all with PDS 5/0. This defines the anterior and posterior wall and ensures even distribution of the anastomotic margins in the bile duct and jejunum. Since this anastomosis cannot be flipped over, the anastomosis of the posterior wall is performed first.

    This is carried out with interrupted sutures inside-out through all layers, with the knots located within the lumen. Depending on the diameter of the bile duct, this should require at least seven sutures with PDS 5/0 or 6/0.

    Note: For a clearer view, first place all sutures before tying their knots. After the sutures have been tied, cut off one suture end and collect the remaining end together with the others in a clamp. This makes it easier to place any additional sutures into gaps. Once the posterior wall has been completed cut off these remaining suture ends.

  • Creating the bilioenteric anastomosis – suturing the anterior wall

    Paid content (video)
    Paid content (image)

    This carried out with interrupted sutures outside-in through all layers, employing the same technique as with the posterior wall.

    Note: For a clearer view, the four sutures anchoring the mucosa (see surgery figure step 4) have been left out of this figure.

  • Closing the mesenteric window

    Paid content (video)
    Paid content (image)

    Inspect the anastomosis. Close the mesenteric window, irrigate and control any bleeding. Place an EasyFlow drain near the anastomosis.