
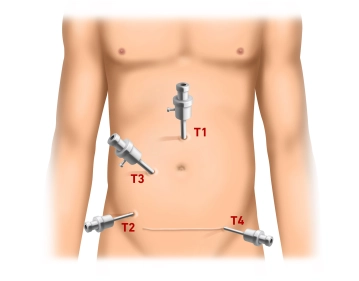
The procedure begins with a mini-laparotomy for the camera trocar (T1, 10 mm) approximately 3 cm above the umbilicus. After inserting the trocar, pressure-controlled establishment of the pneumoperitoneum up to 13 mm Hg and inspection of the abdominal cavity for possible adhesions (status post abdominal hysterectomy via Pfannenstiel incision). Under endoscopic view, successive insertion of the working trocars: T2 (5 mm) right lower abdomen at the level of the anterior superior iliac spine, T3 (10 mm) approximately in the middle on a slightly arched connecting line between T1 and T2. Finally, insertion of T4 (5 mm) in the left lower abdomen suprasymphyseal in the course of the later Pfannenstiel incision.
-
Establishing the Pneumoperitoneum and Trocar Positioning
![Establishing the Pneumoperitoneum and Trocar Positioning]()
Soundsettings -
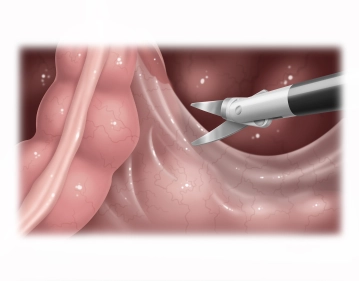
Opening of the right-sided pelvic peritoneum
![Opening of the right-sided pelvic peritoneum]()
Soundsettings The operating table is tilted head-down (Trendelenburg position) and the greater omentum and small intestine are displaced into the upper abdomen or right middle abdomen using two atraumatic grasping forceps. Under traction, the sigmoid colon (in the video example, a considerable elongated sigmoid is present) is displaced to the left side, thereby tensioning and lifting the rectum. Now, right-sided opening of the pararectal peritoneum starting from the promontory along the peritoneal reflection using bipolar scissors (alternatively: LigaSure® or BowaNightKnife®) after identification of the ureter and pelvic vessels. The dorsal fascial cleft space between the parietal pelvic fascia (Waldeyer's fascia) and the mesorectum is opened as far as possible.
Notes
- The ureter should be identified before starting the dissection; however, it is not necessary to dissect it free or to loop it.
- The lateral suspension of the descending colon should be preserved to prevent later sinking into the lesser pelvis.
-
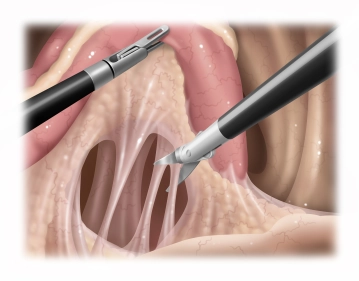
Dorsal Mobilization of the Rectum
![Dorsal Mobilization of the Rectum]()
Soundsettings The rectum is reflected to the right and the lateral peritoneum on the left side is incised. Subsequently, the dorsal mobilization of the rectum is performed while preserving the mesorectum or the vascular axis. A connection to the opposite side is created, so that the rectum can be lifted and the dorsal preparation continued to the pelvic floor.
Lateral and ventral mobilization of the rectum
The incision of the ventral peritoneal fold and subsequent preparation of the rectum in the anterio
The incision of the ventral peritoneal fold and subsequent preparation of the rectum in the anterio
Activate now and continue learning straight away.
Single Access
Activation of this course for 3 days.
US$9.10
inclusive VAT
Most popular offer
webop - Savings Flex
Combine our learning modules flexibly and save up to 50%.
from US$7.08 / module
US$85.05/ yearly payment
general and visceral surgery
Unlock all courses in this module.
US$14.17
/ month
US$170.10 / yearly payment
Webop is committed to education. That's why we offer all our content at a fair student rate.