Suturing and knot tying technique

  1. Basics of surgical knot tying

    Surgical knots may be tied with one hand or two hands. When tying the surgical knot with one hand, one hand applies constant traction on one limb, while the other hand ties a throw or loop with the other limb of the suture. In the two-handed technique, both hands tie the knot equally and thus create a more direct and secure knot (see surgical knot video). The drawbacks of the two-handed technique are the lack of traction on both limbs of the suture and the fact that it is more difficult to learn.

    The single-handed technique alternates between knot tying with the index and the middle finger. Knot security is achieved by switching the hand/suture limb applying the traction.

    The benefits of this technique include faster tying speed, continuous limb traction (particularly useful when tying at depth, e.g., in the lesser pelvis) and ease of learning. As a rule, only two overlaid loops (i.e., two throws) will lock the knot. Final seating of the first two throws is achieved by alternating the hand/limb applying the traction. The first throw determines the traction on the tissue, while the second locks the first.

    The following video sequences illustrate the basic techniques for single-handed knot tying from the perspective of a right-handed surgeon. Here, the "traction limb" is always in the left hand and the "knot tying limb" in the right hand.


  2. Knot tying with the middle finger

    Video
    Knot tying with the middle finger

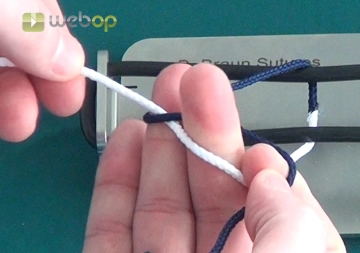
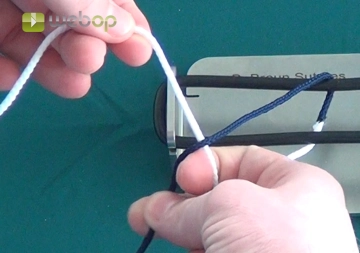
    Grasp the suture limbs between index finger and thumb . The limb to be used for tying must first cross under the traction limb to avoid an overthrow which would impair knot security. With the right hand in supination (palm facing up), place the middle and ring fingers on the knot tying limb. At the same time place the traction limb on the middle and ring finger of the right hand. With the bent right middle finger pull the knot tying limb behind the traction limb. While the thumb and index finger of the right hand release the knot tying limb, fashion the throw by anchoring the knot tying limb with the middle and ring fingers stretched out once again and then pulling it behind to the right. And finally, with the right index finger push the throw down along the traction limb.

    The example demonstrates the base throw with two follow-on throws, with the last throw achieving reversal by alternating the hand applying the traction. A total of 4 throws are recommended with braided sutures. When tying the last two throws, alternate the traction limb / hand applying the traction. 6 to 8 throws are recommended with monofilament sutures. To achieve reversal and thus secure knots after the first two throws, tie all other throws by alternating the traction limb / hand applying the traction.

    Note: Alternatively (not illustrated in the video), crossing the hands after tying the throws will avoid overthrown knots.

  3. Index finger knot tying

    Video
    Index finger knot tying

    With the hand applying traction, grasp the limb of the suture with thumb and index finger, while the knot tying hand grasps the other limb with thumb and middle finger. The suture limb used for tying now first crosses over the traction limb to avoid overthrowing. Load the knot tying limb onto the index finger and then guide this finger over the traction limb. This creates an "opening" between both limbs. Now bend the index finger of the tying hand such that its tip can be brought behind the tying suture limb. By straightening the index finger again, this will pull the tying limb forward out through the opening. Then anchor the tying limb between the index and middle finger and fashion the throw by moving the right hand sideways. Finally (not illustrated in the video sequence), push down the throw again along the traction limb.

    The example demonstrates one base throw and two follow-on throws, with the last throw achieving reversal by alternating the hand applying the traction.

    Note: In the video sequence, the overthrown knot is not pushed down since this would not provide secure seating. Here, too, the alternative of crossing the hands after tying the throws will avoid overthrown knots.

  4. Square knot

    Video
    Square knot

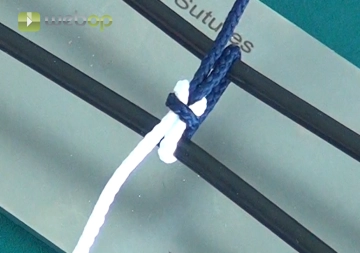
    The square knot is the surgeon's most reliable knot. It is fashioned in single-handed technique by combining both throws shown above, guided by the middle and index finger, respectively. Reversing both throws placed on top of each other will lock the knot.
    The first throw determines the traction on the tissue, while the second provides knot security.

    Knot security can be improved even further by adding additional square knots.

    Note: A higher number of throws (approx. 6 to 8) can compensate for the poorer knot security of monofilament suture material.

  5. Slip knot

    Video
    Slip knot

    Combining both throws presented above, guided with the middle and index finger respectively, the slip knot is a single-handed technique particularly suitable for tying at depth, since the suture is under constant traction, thus ensuring good knot security. Fashion the first two throws using the same technique (guiding with middle and index finger respectively). Depending on the chosen technique, crossing over or under is only necessary the first time. This creates two parallel throws, which are pulled tight along the traction limb, but can also come loose again; they can therefore slip. The first two throws are then locked in position by a reversed throw. In the example shown, the throw tied with the index finger locks the two preceding throws tied with the middle finger. Follow this with two more throws tied with the middle finger while alternating the traction limb / hand applying the traction. This finally secures the knot.

Surgeon’s knot

Whereas this also combines throws tied with the middle and index finger, here both techniques are p

Activate now and continue learning straight away.

Single Access

Activation of this course for 3 days.

€4.99 inclusive VAT

Most popular offer

webop - Savings Flex

Combine our learning modules flexibly and save up to 50%.

from €3.29 / module

€39.50 / yearly payment

price overview

general and visceral surgery

Unlock all courses in this module.

€9.08 / month

€109.00 / yearly payment