
A 55-year-old male patient with squamous cell carcinoma of the distal third of the esophagus had undergone abdominothoracic esophagectomy with gastric conduit reconstruction and end-to-end esophagogastrostomy (manual suture) following neoadjuvant chemoradiotherapy. On postoperative day 5, elevation of the infection markers was noted. Endoscopic follow-up examination revealed staple line failure affecting approximately one-quarter of the anastomotic circumference 25 cm from the dental arch. The leakage cavity behind it was visualized to a depth of about 8 cm. During the same examination, the first Eso-Sponge was inserted into the leakage cavity. The following video demonstrates the second Eso-SPONGE® replacement.
-
Technique
-
Preparation
![Preparation]()
The Eso-SPONGE® treatment set comprises an open-cell polyurethane sponge inserted through an overtube with pusher, rerouted transnasally and then connected to an adjustable medical pump. To prepare for treatment, unpack the components of the set; if necessary, already thread the drainage tube of the sponge through the pusher. Prepare sterile hydrogel, NaCl or Ringer solution, a Ch. 16 gastric tube, and various clamps.
-
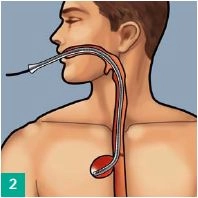
Visualizing and placing the overtube into the leakage cavity
![Visualizing and placing the overtube into the leakage cavity]()
Prior to Eso-Sponge placement size the wound cavity by flexible endoscopy. Slip the overtube over the endoscope (moisten with lubricant or silicone spray) and introduce the tube under vision to the end of the leakage cavity, with the endoscope serving as a guide. Maintain the overtube in position and carefully withdraw the endoscope.
-
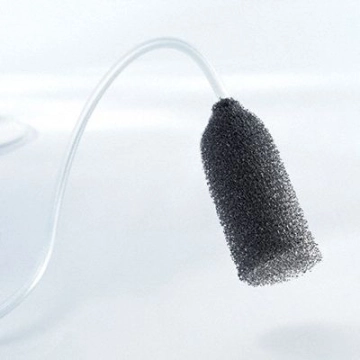
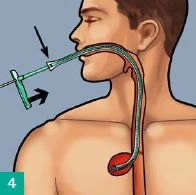
Inserting the sponge
![Inserting the sponge]()
With the sponge possibly trimmed to size, wet it with sterile hydrogel (Askina® gel) and introduce it into the overtube. Advance Eso-SPONGE® to the mark with the pusher - the sponge is now at the end of the overtube. Hold the pusher in place and pull back the overtube to the handle of the pusher; this will release the sponge in the leakage cavity. Now remove overtube and pusher together. Check the sponge position with the endoscope and correct, if necessary, with an endoscopic grasper.
-
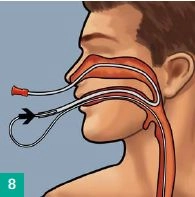
Transnasal routing
![Transnasal routing]()
Feed a gastric tube or a suction catheter Ch 16 (not included in the set) through the nose and out through the mouth, cutting off the atraumatic tip if necessary. Connect the Eso-SPONGE® drainage tube to the gastric tube in front of the mouth. Pull back together both gastric and drainage tube through the nose. The drainage tube now follows the transnasal route.
Connecting the drainage tube to the Y-connector
Slight beveling of the Eso-SPONGE® drainage tube may facilitate insertion. If needed, connect two s
Slight beveling of the Eso-SPONGE® drainage tube may facilitate insertion. If needed, connect two s
Activate now and continue learning straight away.
Single Access
Activation of this course for 3 days.
€7.99 inclusive VAT
Most popular offer
webop - Savings Flex
Combine our learning modules flexibly and save up to 50%.
from €3.70 / module
€44.50 / yearly payment
general and visceral surgery
Unlock all courses in this module.
€12.42
/ month
€149.00 / yearly payment