
- positioned in lithotomy position
- It is recommended to adduct both arms (caution: cotton wrapping when positioning with a cloth sling), or to position one arm on the assistant's side
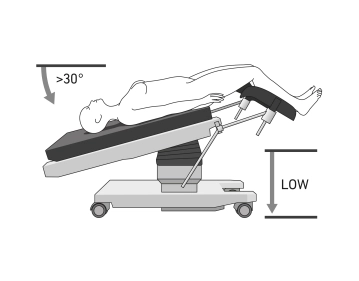
- The legs should be adjustable via the operating table control during the procedure
- if necessary, use shoulder supports to prevent the patient from slipping on the operating table
- if necessary, attach a cervical adapter
-
Positioning
![Positioning]()
-
Creation of capnoperitoneum and insertion of the optical trocar
Soundsettings Incision below the umbilicus. Before inserting the Veress needle, the abdominal wall should be lifted to increase the distance from the intra-abdominal organs. Creation of a pneumoperitoneum by introducing a Veress needle.
TIP: When penetrating the fascia and peritoneum, there are often two distinct resistances. After penetrating the peritoneum, the movement feels free and smooth. Begin the insufflation of CO₂ slowly. An initial pressure below 10 mmHg and a steady pressure increase with constant gas flow indicate correct positioning.
-
Optical trocar and inspection of the abdomen
Soundsettings Insertion of the optical trocar. During laparoscopy, the inspection of the abdomen is performed, including the upper abdominal area, the diaphragmatic domes, the liver, the gallbladder, the stomach, and the omentum. Additionally, an inspection of the intestines and the peritoneum is conducted.
-
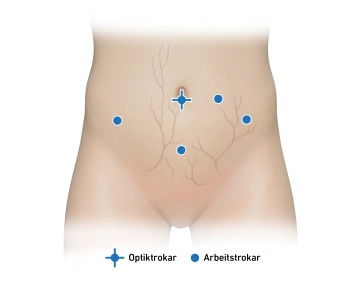
Working trocars
![Working trocars]()
Soundsettings Head-down positioning and placement of 2 additional working trocars under direct vision.
The selection of the number and position of laparoscopic incisions is at the discretion of the surgeon and is based on their personal preferences as well as the specific requirements of the operation. Incisions are often chosen in the left and right lower abdomen or in the left and lower and mid-abdomen (left periumbilical).
Procedure for incisions in the lower abdomen: Visualization of the inferior epigastric artery in the lateral umbilical fold. Lateral to this, the superficial vessels are visualized via diaphanoscopy (superficial circumflex iliac artery, superficial epigastric artery). Two transverse fingers medial to the anterior superior iliac spine, in the vessel-free area, incision and insertion of a working trocar into the lower abdomen.
Procedure for incisions in the mid-abdomen (mostly left): Visualization of the inferior epigastric artery in the lateral umbilical fold. The superficial vessels are visualized via diaphanoscopy. Incision at the level of the navel and approximately 3 cm lateral to it. It is important to ensure that the incision is not too close to the optical trocar or in line with the working trocar of the lower abdomen, to avoid collision risk.
Procedure for suprapubic incisions: Preoperative placement of a bladder catheter to empty the bladder. 1-2 fingerbreadths above the symphysis, the superficial vessels are visualized via diaphanoscopy. Incision and insertion of the working trocar under direct vision.
Inspection of the pelvis and lavage cytology
Inspection of the PelvisThe inspection of the pelvis is conducted systematically:Uterus:Assessment
Inspection of the PelvisThe inspection of the pelvis is conducted systematically:Uterus:Assessment
Activate now and continue learning straight away.
Single Access
Activation of this course for 3 days.
US$9.10
inclusive VAT
Most popular offer
webop - Savings Flex
Combine our learning modules flexibly and save up to 50%.
from US$4.23 / module
US$50.80/ yearly payment
gynecology
Unlock all courses in this module.
US$8.46
/ month
US$101.60 / yearly payment
Webop is committed to education. That's why we offer all our content at a fair student rate.