Supracervical hysterectomy, bilateral salpingectomy, robot-assisted laparoscopy (DaVinci)

Reading time readingtime 32:24 min.
Activate now
  1. Positioning

    Positioning 1
    Positioning 2
    Positioning 3
    • Positioning is done in lithotomy position (or more safely on spreadable straight leg supports), ideally on a large vacuum cushion or non-slip mat
    • It is recommended to adduct both arms (caution: cotton wrapping when positioning with a cloth sling), or to abduct one arm on the side of the robot
    • For leg positioning, padded "boots" are recommended so that the legs can be moved separately and covered sterilely if necessary. Alternatively, the legs can be positioned in leg holders with fixation in these (caution: compartment syndrome).
    • The legs should be adjustable via the OR table control during the procedure
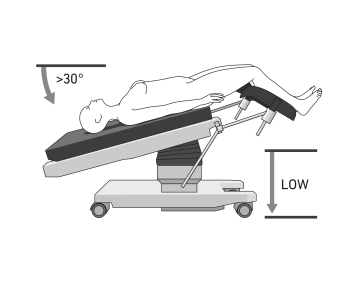
    • Shoulder supports bilaterally to prevent the patient from slipping on the OR table
    • For longer procedures, application of pneumatic compression cuffs for the legs for thrombosis prophylaxis
    • Attachment of a cervical adapter

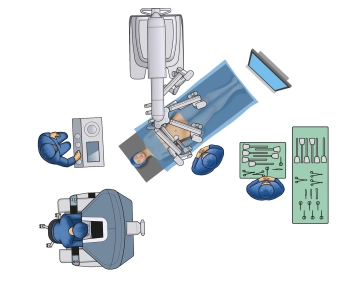
    Note: It is important to note the risk of injury to the patient from the instruments if the patient slips. With coupled tables in the Xi System, intraoperative position changes are possible without uncoupling. If the "Table-Motion" technique is not available, the surgical robot must always be undocked and removed from the OR table before any position change


  2. Trocar positioning and docking

    Trocar positioning and docking

    Creation of a capnoperitoneum by inserting a Veress needle approximately 20 cm away from the target anatomy (usually periumbilical). The three to four 8 mm robotic trocars are positioned in a straight, horizontal line (Xi) or a slightly curved line towards the operative site (X, SI). The distance between each trocar is ideally 8 cm (minimum 7 cm to maximum 10 cm). The 10 or 12 mm assistant trocar can be placed in the lower abdomen, cranial to the trocars, or as an additional trocar along the straight line, depending on the assistant's positioning at the operating table and the surgeon's preference (see illustration). The patient is positioned at the end of the operating table and then placed in a steep Trendelenburg position (approximately 30°). The table tilt is adjusted as necessary for anesthetic or surgical requirements. The laser marking is aligned so that the crosshair points directly at the camera trocar (Xi). The Da Vinci system is then aligned. The arms are connected (docked) with the three to four 8 mm robotic trocars. Subsequently, the instruments are introduced under visual control and parked under the anterior abdominal wall.

    Caution: The trocars must be positioned with the wide black ring at the level of the muscular abdominal wall (so-called remote center) to avoid injury during movement.

    Note: Depending on the operating room and the surgeon's preference, the positioning of the da Vinci "patient cart" and the trocars may vary.

  3. Inspection of the small pelvis

    Video
    Inspection of the small pelvis

    Visualization of the uterus and both adnexa. Subsequently, assessment of the Douglas pouch. Transperitoneal visualization of both ureters.

  4. Right salpingectomy

    Video
    Right salpingectomy

    Grasp the uterine tube at the distal portion and luxate it to better display the fimbrial funnel and the mesosalpinx. The uterus is mobilized to the left using the portio adapter to tension the structures in the area of the right pelvic wall. Anastomoses of the tubal branch of the uterine artery and the tubal branches of the ovarian artery run in the mesosalpinx. In the distal portion, just before the fimbrial funnel, there is often a somewhat larger anastomosis. Bipolar coagulation in this area and then stepwise detachment of the tube from the right pelvic wall using a monopolar scissors while carefully sparing the right ovary.

    Note: Depending on the surgeon's preference, the uterine tube can be detached from the uterus after bipolar coagulation and extracted through the working trocar.

  5. Right ovarian ligament

    Video
    Right ovarian ligament

    Presentation of the ovarian ligament. Here runs the ovarian branch of the ovarian artery. Bipolar coagulation and transection using monopolar scissors.

    Note: In clinical practice, it has been proven effective to coagulate the ovarian ligament at 2-3 points.

Vascular mesometrium and right broad ligament

Opening of the peritoneum over the structures of the dorsal broad ligament. Care is taken to strict

Activate now and continue learning straight away.

Single Access

Activation of this course for 3 days.

US$9.10  inclusive VAT

Most popular offer

webop - Savings Flex

Combine our learning modules flexibly and save up to 50%.

from US$4.20 / module

US$50.48/ yearly payment

price overview

gynecology

Unlock all courses in this module.

US$8.41 / month

US$101.00 / yearly payment