Cholecystectomy, Robotic-Assisted

Reading time readingtime 21:13 min.
Activate now
  1. Positioning and Setup

    510_Lagerung.jpg
    510_PM.jpeg
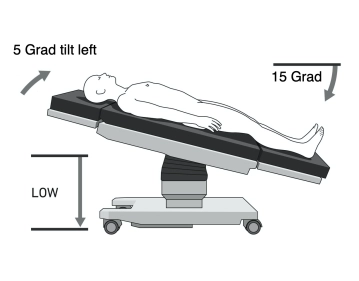
    • Patient placed in supine position on a vacuum cushion; left arm optionally abducted
    • Operating table adjusted to 15° anti-Trendelenburg and tilted 5° left
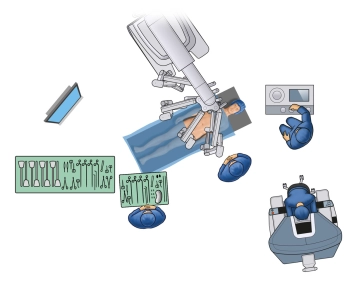
    • Robotic arms docked from the right or cranial-right position

    Important Notes:

    • Docking alignment is critical; without a table-motion function, undocking is required for table adjustments. Ensure vacuum cushion integrity before draping

    Assistants and nursing staff position themselves to the patient’s left, while anesthesia is stationed at the head

    The robot (Patient Cart) is positioned from the right or right cranial side and docked. The surgeon operates from the console, ideally with a view of the patient.

  2. Pneumoperitoneum, Trocar Placement, and Docking

    Video
    513_Trokarpositionen.jpeg
    • Pneumoperitoneum: Established via Veress needle at Palmer’s Point. Aspiration and drop tests confirm position; inflated to 15 mmHg

    Due to variations in abdominal wall compliance, it is advisable to determine and mark the optimal trocar positions on the inflated abdomen under pneumoperitoneum.

    Note: Alternatively, the insertion of the first trocar can be performed openly, depending on the clinic’s protocol.

    • Trocar Placement: Four robotic trocars inserted in a diagonal line below the costal margin, 15–20 cm from the target anatomy, spaced ~8 cm apart

    The arms are connected to the robotic trocars (docked). First, the targeting maneuver is performed. Subsequently, the instruments are inserted under direct visualization and parked beneath the ventral abdominal wall.

    Trocar Instrumentation (from right to left):

    • Port 1: Bipolar forceps
    • Port 2: Camera (30°)
    • Port 3: Monopolar scissors, large clip applier
    • Port 4: Tipup grasper

    Caution: Ensure that the trocars are positioned with the wide black ring (remote center) aligned at the level of the muscular abdominal wall (remote control) to minimize shear forces during movement.

  3. Checklist Before Docking

    • Make a stab incision in the left upper abdomen and insert the Veress needle
    • Establish pneumoperitoneum at 15 mmHg
    • Mark a diagonal line parallel to the costal margin and the trocar placement points
    • Insert an Xi trocar
    • Manually introduce the camera
    • Insert three additional robotic trocars, each spaced 8 cm apart
    • Position the table at 15° anti-Trendelenburg and tilt 5° left
    • Dock the camera arm and introduce the camera
    • Perform targeting
    • Dock the remaining three robotic arms
    • Maintain a fist-width distance between the robotic arms
    • Verify the alignment of the remote centers
    • Insert the instruments and guide them to the target anatomy
    • Perform “burping” as necessary
    • Transition to the console
  4. Exposing the Gallbladder

    Video
    Exposing the Gallbladder
    • Fundus grasped with Tipup forceps (Port 4) and lifted cranially. Adhesions between omentum and gallbladder are released with scissors. Infundibulum is exposed gradually.
  5. Serosal Incision at the Infundibulum

    Video
    Serosal Incision at the Infundibulum

    The infundibulum is grasped with bipolar forceps and retracted laterally. During this step, the duodenum is carefully mobilized by detaching and separating any adhesions.

    Caution: Avoid any injury to the duodenum during this process.

    Using scissors, make an incision in the serosal layer of the infundibulum above Rouviere’s sulcus.

Dissection of Calot’s Triangle

Structures within Calot’s Triangle are isolated bluntly and sharply.Cystic duct: Exposed, mobilized

Activate now and continue learning straight away.

Most popular offer

webop - Savings Flex

Combine our learning modules flexibly and save up to 50%.

from €3.29 / module

€39.50 / yearly payment

price overview

Robotik

Unlock all courses in this module.

€7.42 / month

€89.00 / yearly payment