Start your free 3-day trial — no credit card required, full access included

Pylorus-preserving pancreaticoduodenectomy, according to Longmire-Traverso, robotically assisted

Reading time readingtime 48:47 min.
Activate now
  1. Positioning and Setup

    513 Lagerung Kopftief maximal initial.jpg
    513_Setup.jpeg

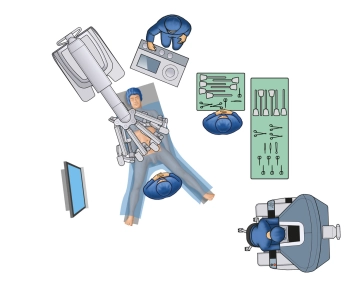
    The patient is positioned in supine position on the large vacuum cushion. The left arm can be positioned separately. The use of the cushion eliminates the need for any additional supports.

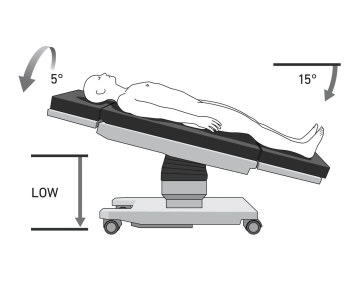
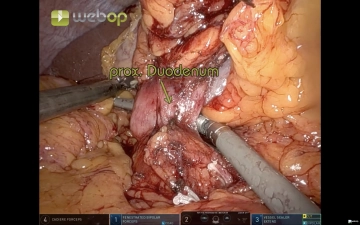
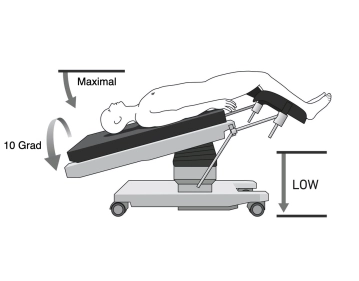
    Initially, for the Artery First Approach, the patient is positioned in maximum head-down and right lateral position. From step 5 (opening of the bursa), the patient is then positioned slightly head-up and slightly in right lateral position.

    Important: The positioning is of particular importance due to the docking of the patient to the robot's manipulator. Unless a coupled table (so-called Table-Motion function) is available, the arms must be undocked before each table movement. There is also a risk of injury if the patient slips.

    Note: Vacuum cushions can have leaks. Check again before sterile draping.

    The surgeon ideally sits at the console with the ability to look at the patient and the table assistant. The surgical robot (Patient Card) is approached to the patient from the cranial side in the X-System. In the Xi, the Patient Card can be variably approached to the patient, for example, directly from the right. The table assistant stands or sits on the left side of the operating table. Anesthesia is located at the head of the patient, and the scrub nurse is positioned to the right of the patient's legs with the table over the legs.

  2. Trocar positioning and docking

    Video
    513_Trokarpositionen_NEU Kopie.jpg
    Soundsettings

    Creation of a pneumoperitoneum of 15 mmHg using a Veress needle at Palmer's Point in the left upper abdomen. Due to the varying abdominal wall compliance, it is advisable to determine the optimal position of the trocars on the inflated abdomen with pneumoperitoneum.

    Note: Alternatively, the creation of the pneumoperitoneum can also be performed using the Optiview technique.

    The three 8mm robotic trocars (Trocar 1-3) and the 12 mm robotic trocar (Trocar 4) are positioned on a line slightly curved cranially at the sides (smiley) 15 cm below the anticipated lower edge of the pancreas (usually below the navel). The trocars are inserted symmetrically with a distance of 8 cm between each other. In the left lower abdomen, a 12 mm assist trocar is placed 3 cm caudal to the aforementioned trocar line between Trocar 3 and 4. The patient is initially positioned maximally in a head-down and right lateral position. The patient cart is slightly offset to the right over the patient's head. The arms are connected (docked) with the four robotic trocars. Subsequently, the instruments are introduced under visual control and parked under the ventral abdominal wall.

    Important: The trocars must be positioned with the wide black ring at the level of the muscular abdominal wall (so-called remote control) to avoid injury during movement.

    Note: Ideally, the robotic trocars are inspected with the camera via the assist trocar when introducing the robotic instruments. This allows the position of all robotic trocars to be easily checked again before the start of the operation.

  3. Checklist before docking

    • Incision in the left upper abdomen, insertion of the Veress needle
    • Pneumoperitoneum
    • Marking the line and points for trocars (15-18 cm below the lower edge of the pancreas)
    • Insertion of 4 Xi trocars 8 cm apart (12 mm with reducer sleeve on the far left)
    • Insertion of the camera manually after inserting the first trocar and insertion of the other trocars under vision
    • Assistant trocar in the left lower abdomen caudally between the 3rd and 4th trocar from the right
    • if necessary, 2nd assistant trocar
    • Positioning: initially: maximum in head-down and right lateral position
    • Dock the camera arm + insert the camera
    • Targeting (Xi)
    • Dock 3 additional arms
    • Arms always one fist-width apart
    • Control of the remote center
    • Insertion of instruments and introduction into target anatomy: from right to left (from the patient's perspective) Trocar 1: Cardiere grasping forceps/Tip-up grasping forceps, Trocar 2: Bipolar forceps, Trocar 3: Camera, Trocar 4: Vessel sealer/scissors Assistant trocar: atraumatic grasping forceps, suction
    • Burping (by pressing the port coupling twice quickly)
    • Switch to the console
  4. Skeletonization of the first jejunal loop and the duodenum parts III and IV (reversed Kocher)

    513 4 reversed kocher.jpg
    Soundsettings

    The operation is performed using a Cadiere grasping forceps through the trocar on the right outside, with bipolar forceps to the left (two left hands) followed by the camera and the monopolar scissors on the far left outside. Subsequently, the Vessel Sealer® is also used through this trocar.

    The entire small intestine is relocated to the right upper abdomen until the ligament of Treitz is well visualized. The mesenteric root and the duodenum parts 3 and 4 are completely separated from the prerenal fascia. This preparation is carried out to the right of the vena cava.

    Subsequently, the second jejunal loop is skeletonized at the future transection site, but it is not transected. The preparation is directed from the intestine towards the superior mesenteric artery. The mesentery of the first jejunal loop and the uncinate process are dissected from the left lateral and dorsal wall of the artery using the Vessel Sealer. The vascular branches leading into the duodenum and the uncinate process are coagulated with the Vessel Sealer (only rarely double clipped) and transected. Through the mobilization of the mesenteric root, it is already possible at this point to completely detach parts 3 and 4 of the duodenum from the posterior side of the mesenteric root. After completing this "artery first" preparation, a small compress is placed dorsal to the duodenum.

    The patient is briefly undocked to reposition them for the rest of the operation (slightly head down and slightly in right lateral position).

    Note: Only through this initial positioning can the region dorsal to the mesenteric root be cleanly prepared. The jejunal loop is not transected so that it can later be elevated into the right upper abdomen. This is very difficult or impossible if it is transected at this point, as in open surgery.

  5. Opening of the bursa, transection of the gastroepiploic vessels

    513_Lagerung Fusstief.jpeg
    513 5 Eröffmnung Bursa.jpg
    Soundsettings

    The patient is now placed in a slight Trendelenburg position and slightly tilted to the right. The robotic arms are re-docked to the trocars. The gastrocolic ligament is transected with the vessel sealer, and the bursa is opened via this route. The right-sided transverse mesocolon is dissected from the mesogastrium in layers. The narrow bridge of the omentum between the right transverse colon and the duodenum is transected with the vessel sealer. The duodenum comes into view, and the plane of the initial dissection from the left and caudal can be easily reached (the inserted compress comes into view). The confluence of the middle colic vein and Henle's trunk into the superior mesenteric vein is displayed. The gastroepiploic vein is double clipped centrally and single clipped peripherally at Henle's trunk and transected. The same procedure is followed for the right gastroepiploic artery.

    Important: During dissection around the vessels, bleeding may occur. We always have an 8 cm long 4/0 Prolene® RB at the table, which is equipped with a clip at the end. This allows for quick replacement of the scissors with a large needle driver through the far-left trocar without any time loss, and vessel injuries can be managed with this suture.

  6. Transection of the duodenum

    513 6 Absetzen Duodenum.jpg
    Soundsettings

    In the intended pylorus-preserving pancreatic head resection, the duodenum is now circumferentially exposed approximately 3 cm aboral to the pylorus and transected with a robotic stapler, 45 mm, blue cartridge. The stomach can then be placed in the left upper abdomen and does not interfere with further preparation.

  7. Lymphadenectomy 1 and transection of the gastroduodenal artery

    513 7 Gasrroduodenalis.jpg
    Soundsettings

    The liver is elevated with the Cadiere forceps. Detachment of the lesser omentum from the liver surface. Identification of the left gastric artery at its origin from the common hepatic artery. The artery is clipped and transected. Beginning at the celiac trunk, the entire fatty and lymphatic tissue is mobilized en bloc to the resection specimen. The dissection follows the common hepatic artery to the origin of the gastroduodenal artery. The vessel is double clipped centrally and single clipped peripherally and transected. Along the proper hepatic artery, the arterial branches of the liver are initially dissected free up to the hilum.

  8. Cholecystectomy, transection of the hepatic duct, and lymphadenectomy 2

    513 8 D hepaticus2.jpg
    Soundsettings

    Elevation of the liver with the Cadiere protected by a compress. The gallbladder is dissected antegradely starting at the fundus. It is important to remain in the correct layer. The dissection is primarily performed with the monopolar scissors. For targeted hemostasis in the gallbladder bed, the bipolar forceps are suitable. The dissection continues until the ligament is reached. The hepatic duct can now be encircled just below its bifurcation. Peripherally, it is closed with a clip, while centrally, we always leave it open to avoid traumatizing the tissue.

    Visualization of the cystic artery, which originates from the right hepatic artery. The cystic artery is double clipped and transected.

    Note: The right hepatic artery often crosses under the hepatic duct.

    Then visualization, clipping, and transection of a direct venous branch of the gallbladder to the portal vein. Now, all lymphatic tissue with the bile duct and attached gallbladder is mobilized towards the pancreatic head, and the well-visible portal vein is fully exposed.

    Important: During the antegrade dissection of the gallbladder towards the ligament, always be mindful of the branches of the right hepatic artery, which can be "at risk" for injury here. The anatomy of the hepatic arteries varies significantly among many patients. Despite thorough study of the angiographic CT before the operation, this should be very present during dissection in the area of the hepatoduodenal ligament.

  9. Tunneling and transection of the pancreas

    513_09.jpg
    Soundsettings

    Representation of the inferior border of the pancreas in the area of the medial corpus and the neck. For this, the pancreas is atraumatically lifted with a branch of the Cadiere and the caudal entry behind the pancreas in front of the superior mesenteric vein and the confluence is prepared with the monopolar scissors. This allows the pancreas to be gradually dissected from the underlying vein. Hemostasis of small bleedings on the posterior surface of the pancreas is achieved with the bipolar forceps.

    The pancreas is now transected from the caudal approach using scissors. The often spurting bleeding marginal vessels are sutured with 4/0 Prolene (without clips on the sutures; they otherwise interfere with the anastomosis!). From the ventral side, the pancreatic tissue can now be detached from the confluence and the portal vein to the right as far as possible. To the left, the body of the pancreas is circumferentially dissected over a good centimeter in preparation for the later Blumgart anastomosis.

Mobilization of the Processus uncinatus

Elevation of the left liver lobe with the Cadiere protected by a gauze. Now, the uncinate process w

Activate now and continue learning straight away.

Single Access

Activation of this course for 3 days.

US$9.30  inclusive VAT

Most popular offer

webop - Savings Flex

Combine our learning modules flexibly and save up to 50%.

from US$4.29 / module

US$51.56/ yearly payment

price overview

robotics

Unlock all courses in this module.

US$8.59 / month

US$103.10 / yearly payment