Start your free 3-day trial — no credit card required, full access included

Gastrectomy, subtotal, robotically assisted

Reading time readingtime 37:59 min.
Activate now
  1. Positioning and Setup

    514 Setup Magen.jpg
    514_Lagerung.jpeg

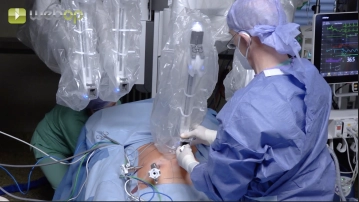
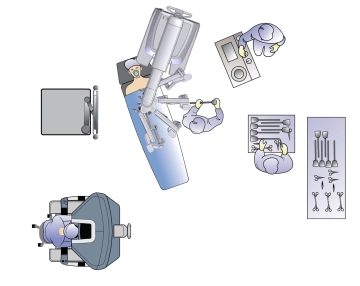
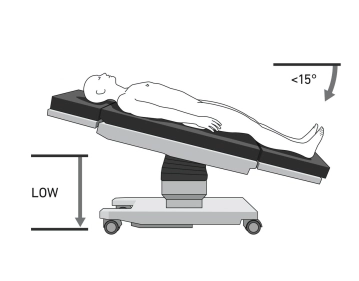
    The patient is positioned in a supine position on the large vacuum cushion. The left arm can be positioned away from the body. The use of the cushion eliminates the need for any additional supports. The table assistant sits to the left of the patient. The video tower is positioned on the right at torso height. Anesthesia is located at the head of the patient, and the surgical nurse is to the left of the table assistant. The patient is placed in a 15-degree reverse Trendelenburg position before docking.

    Caution: Positioning is of particular importance due to the docking of the patient to the robot's manipulator. There is a risk of injury to the abdominal wall if the patient slips.

    Note: Vacuum cushions may have leaks. Check again before sterile draping.

  2. Creation of Pneumoperitoneum and Trocar Positioning

    Video
    514_Trokarpositionen Kopie 3 als 12 mm.jpg
    Soundsettings

    The four robotic trocars are positioned on a line slightly curved cranially at the sides (smiley) 15 cm below the anticipated course of the transverse colon (always below the navel). The trocars are inserted symmetrically with a distance of 8 cm between each. The third trocar from the patient's right side is a robotic 12 mm trocar, while the other three are 8 mm trocars. In the left lower abdomen, a 12 mm assist trocar is placed between trocars 3 and 4, 3 to 4 cm caudal to the aforementioned trocar line. The patient is positioned in a moderate foot-down position (15 degrees anti-Trendelenburg).

    Caution: The trocars must be positioned with the wide black ring at the level of the muscular abdominal wall (so-called Remote Center) to minimize shear movements in the abdominal wall and prevent injury during movement.

  3. Docking

    Docking
    Soundsettings

    The patient cart is positioned slightly to the left over the patient's head (daVinci X. With the Xi platform, the robot can alternatively be docked from either side of the patient, usually directly from the right for the stomach). The arms are connected (docked) with the four robotic trocars. Subsequently, the instruments are introduced under visual control and "parked" under the ventral abdominal wall. (4: far right from the patient's perspective: Cardiere, 1: bipolar forceps, 2: camera, 3: scissors or vessel sealer, (two left hands).

    Note: Ideally, the robotic trocars are inspected with the camera via the assist trocar when introducing the robotic instruments. This allows for easy verification of the position of all robotic trocars before the start of the operation. It is also checked that the trocars are positioned with the remote center at the level of the muscular abdominal wall.

  4. Checklist until Switching to the Console

    • Incision in the left upper abdomen, insertion of the Veress needle
    • Creation of a pneumoperitoneum
    • Marking the line and points for trocars
    • Insertion of a robotic trocar
    • Insertion of the camera manually
    • Insertion of 3 Xi trocars each 8 cm apart under vision
    • Assistant trocar 12 mm caudal between 3 and 4
    • Positioning: 15° anti-Trendelenburg
    • Docking the camera arm + inserting the camera (3)
    • (Targeting with the Xi)
    • Docking 3 additional arms
    • Arms always one fist width apart
    • Control of the remote center via assistant trocar
    • Burping (double pressing of the port clutch)
    • Insertion of instruments and introduction into target anatomy (1: Cadiere forceps, 2: bipolar forceps, 3: camera, 4: monopolar scissors) (Order from right to left)
    • Switching to the console
  5. En bloc Omentectomy

    En bloc Omentectomy
    Soundsettings

    The operation is performed with a Cadiere grasping forceps through the trocar on the right, bipolar forceps next to it on the left followed by the camera and the monopolar scissors on the far left (from the patient's perspective).

    The omentum is tensioned ventrally and cranially with the Cadiere grasping forceps. The table assistant holds the transverse colon caudally and provides countertraction. The procedure begins at the midline, and initially, the omentum is dissected layer by layer from the transverse colon until the bursa is reached. Dissection is first to the left, detaching the omentum from the left flexure and, if necessary, from the left-sided colon (if adherent). Subsequently, dissection proceeds to the right. Here, the transverse mesocolon is separated from the "mesogastrium" (trunk of the right gastroepiploic vessels). Finally, the omentum is detached from the right flexure and, if necessary, the ascending colon.

    Caution: The omentum extends very close to the transverse colon. Avoid thermal lesions of the transverse colon during dissection! The mesocolon must also be preserved to prevent circulatory disturbances of the colon.

    Note: Omentectomy is a complex and often time-consuming surgical step. However, for oncological reasons, we adhere to the en bloc omentectomy, as it can be performed quickly and safely with the robot.

  6. Dissection of the Right Gastroepiploic Artery and Vein

    Dissection of the Right Gastroepiploic Artery and Vein
    Soundsettings

    The stomach with the attached omentum is elevated cranially and ventrally with the Cadiere. At the lower edge of the pancreas, the junction of the right gastroepiploic vein into the Henle's trunk is exposed. The vessel is clipped centrally with double green Hemoloc® clips and peripherally with a single clip, then transected. The origin of the right gastroepiploic artery from the gastroduodenal artery is similarly clipped and divided.

    Caution: The Henle's trunk requires utmost care during dissection. It is particularly important to preserve the superior right colic vein at this step.

  7. Simultaneous Cholecystectomy (optional, or indicated in the presence of relevant gallbladder pathology)

    514_07 Cholezystektomie.jpg
    Soundsettings

    Now the omentum is repositioned caudally. This requires an initial adhesiolysis from the gallbladder. Visualization of the structures in Calot's triangle. The cystic duct is secured twice with Hem-o-lok clips and transected between them. A similar approach is taken with the cystic artery: double clipping with Hem-o-lok clips and transection between them. Antegrade dissection of the gallbladder from the gallbladder bed using the monopolar scissors. Hemostasis in the gallbladder bed is then achieved using the bipolar forceps. Retrieval of the gallbladder with a retrieval bag concludes this step.

    Note: Whether a cholecystectomy is always indicated during a gastrectomy is a matter of debate. This is determined by the internal standard. In the presence of relevant gallbladder pathology, it is indicated regardless.

Radical Lymphadenectomy Part I

Lifting of the left liver with the Cadiere. Tensioning of the stomach by the assistant and incision

Activate now and continue learning straight away.

Single Access

Activation of this course for 3 days.

US$9.30  inclusive VAT

Most popular offer

webop - Savings Flex

Combine our learning modules flexibly and save up to 50%.

from US$4.29 / module

US$51.53/ yearly payment

price overview

robotics

Unlock all courses in this module.

US$8.58 / month

US$103.10 / yearly payment