Start your free 3-day trial β€” no credit card required, full access included

Gastrectomy, subtotal, robotically assisted

Reading time readingtime 37:59 min.
  1. Positioning and Setup

    514 Setup Magen.jpg
    514_Lagerung.jpeg

    The patient is positioned in a supine position on the large vacuum cushion. The left arm can be positioned away from the body. The use of the cushion eliminates the need for any additional supports. The table assistant sits to the left of the patient. The video tower is positioned on the right at torso height. Anesthesia is located at the head of the patient, and the surgical nurse is to the left of the table assistant. The patient is placed in a 15-degree reverse Trendelenburg position before docking.

    Caution: Positioning is of particular importance due to the docking of the patient to the robot's manipulator. There is a risk of injury to the abdominal wall if the patient slips.

    Note: Vacuum cushions may have leaks. Check again before sterile draping.

  2. Creation of Pneumoperitoneum and Trocar Positioning

    Video
    514_Trokarpositionen Kopie 3 als 12 mm.jpg
    Soundsettings

    The four robotic trocars are positioned on a line slightly curved cranially at the sides (smiley) 15 cm below the anticipated course of the transverse colon (always below the navel). The trocars are inserted symmetrically with a distance of 8 cm between each. The third trocar from the patient's right side is a robotic 12 mm trocar, while the other three are 8 mm trocars. In the left lower abdomen, a 12 mm assist trocar is placed between trocars 3 and 4, 3 to 4 cm caudal to the aforementioned trocar line. The patient is positioned in a moderate foot-down position (15 degrees anti-Trendelenburg).

    Caution: The trocars must be positioned with the wide black ring at the level of the muscular abdominal wall (so-called Remote Center) to minimize shear movements in the abdominal wall and prevent injury during movement.

  3. Docking

    Video
    Docking
    Soundsettings

    The patient cart is positioned slightly to the left over the patient's head (daVinci X. With the Xi platform, the robot can alternatively be docked from either side of the patient, usually directly from the right for the stomach). The arms are connected (docked) with the four robotic trocars. Subsequently, the instruments are introduced under visual control and "parked" under the ventral abdominal wall. (4: far right from the patient's perspective: Cardiere, 1: bipolar forceps, 2: camera, 3: scissors or vessel sealer, (two left hands).

    Note: Ideally, the robotic trocars are inspected with the camera via the assist trocar when introducing the robotic instruments. This allows for easy verification of the position of all robotic trocars before the start of the operation. It is also checked that the trocars are positioned with the remote center at the level of the muscular abdominal wall.

  4. Checklist until Switching to the Console

    • Incision in the left upper abdomen, insertion of the Veress needle
    • Creation of a pneumoperitoneum
    • Marking the line and points for trocars
    • Insertion of a robotic trocar
    • Insertion of the camera manually
    • Insertion of 3 Xi trocars each 8 cm apart under vision
    • Assistant trocar 12 mm caudal between 3 and 4
    • Positioning: 15° anti-Trendelenburg
    • Docking the camera arm + inserting the camera (3)
    • (Targeting with the Xi)
    • Docking 3 additional arms
    • Arms always one fist width apart
    • Control of the remote center via assistant trocar
    • Burping (double pressing of the port clutch)
    • Insertion of instruments and introduction into target anatomy (1: Cadiere forceps, 2: bipolar forceps, 3: camera, 4: monopolar scissors) (Order from right to left)
    • Switching to the console
  5. En bloc Omentectomy

    Video
    En bloc Omentectomy
    Soundsettings

    The operation is performed with a Cadiere grasping forceps through the trocar on the right, bipolar forceps next to it on the left followed by the camera and the monopolar scissors on the far left (from the patient's perspective).

    The omentum is tensioned ventrally and cranially with the Cadiere grasping forceps. The table assistant holds the transverse colon caudally and provides countertraction. The procedure begins at the midline, and initially, the omentum is dissected layer by layer from the transverse colon until the bursa is reached. Dissection is first to the left, detaching the omentum from the left flexure and, if necessary, from the left-sided colon (if adherent). Subsequently, dissection proceeds to the right. Here, the transverse mesocolon is separated from the "mesogastrium" (trunk of the right gastroepiploic vessels). Finally, the omentum is detached from the right flexure and, if necessary, the ascending colon.

    Caution: The omentum extends very close to the transverse colon. Avoid thermal lesions of the transverse colon during dissection! The mesocolon must also be preserved to prevent circulatory disturbances of the colon.

    Note: Omentectomy is a complex and often time-consuming surgical step. However, for oncological reasons, we adhere to the en bloc omentectomy, as it can be performed quickly and safely with the robot.

  6. Dissection of the Right Gastroepiploic Artery and Vein

    Video
    Dissection of the Right Gastroepiploic Artery and Vein
    Soundsettings

    The stomach with the attached omentum is elevated cranially and ventrally with the Cadiere. At the lower edge of the pancreas, the junction of the right gastroepiploic vein into the Henle's trunk is exposed. The vessel is clipped centrally with double green Hemoloc® clips and peripherally with a single clip, then transected. The origin of the right gastroepiploic artery from the gastroduodenal artery is similarly clipped and divided.

    Caution: The Henle's trunk requires utmost care during dissection. It is particularly important to preserve the superior right colic vein at this step.

  7. Simultaneous Cholecystectomy (optional, or indicated in the presence of relevant gallbladder pathology)

    Video
    514_07 Cholezystektomie.jpg
    Soundsettings

    Now the omentum is repositioned caudally. This requires an initial adhesiolysis from the gallbladder. Visualization of the structures in Calot's triangle. The cystic duct is secured twice with Hem-o-lok clips and transected between them. A similar approach is taken with the cystic artery: double clipping with Hem-o-lok clips and transection between them. Antegrade dissection of the gallbladder from the gallbladder bed using the monopolar scissors. Hemostasis in the gallbladder bed is then achieved using the bipolar forceps. Retrieval of the gallbladder with a retrieval bag concludes this step.

    Note: Whether a cholecystectomy is always indicated during a gastrectomy is a matter of debate. This is determined by the internal standard. In the presence of relevant gallbladder pathology, it is indicated regardless.

  8. Radical Lymphadenectomy Part I

    Video
    514_08B.jpg
    Soundsettings

    Lifting of the left liver with the Cadiere. Tensioning of the stomach by the assistant and incision of the lesser omentum at the underside of the liver beginning at the right diaphragmatic crus.

    Caution: At this step, attention must be paid to replacing and accessory vessels to the left liver.

    Remarks: For lifting the liver, a small compress is recommended as a pad between the Cadiere and liver tissue to avoid capsule injuries. We still always use the very small Cadiere as a grasping forceps, as collisions intra- and extracorporeally can be significantly better avoided than with larger grasping forceps.

    Transverse incision of the serosa over the hepatoduodenal ligament at the liver hilum. Lifting of the greater omentum and the stomach and proceeding alternately "from below" and seeking the common hepatic artery. Displaying the origin of the gastroduodenal artery and removal of the fat and lymphatic tissue along it.

    Pulling the stomach and omentum caudally and returning to the hepatoduodenal ligament. Seeking the proper hepatic artery and complete removal of all fat and lymphatic tissue along the hepatic arteries to the hilum. Clipping of the right gastric artery and transection of the same.

    Remark: The lymphadenectomy of the hepatoduodenal ligament and the en bloc resection of the lesser omentum towards the lesser curvature is performed under safe visualization of the hepatic arteries, the portal vein, and the extrahepatic bile ducts.

  9. Transection of the Duodenum / Radical Lymphadenectomy Part II

    Video
    514_09.jpg
    Soundsettings

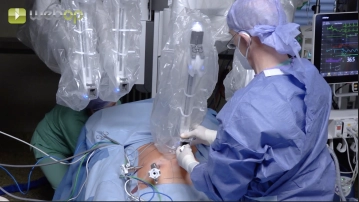
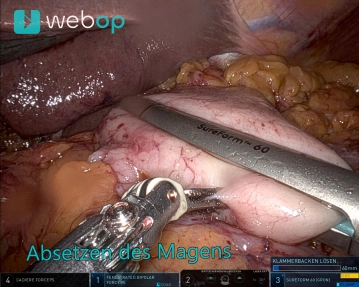
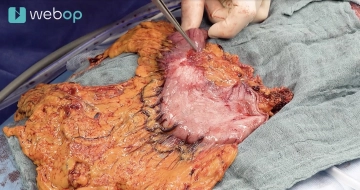
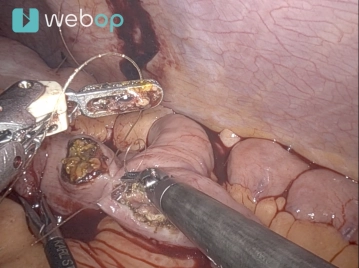
    Now work with two right arms for stapling (stapler on the 12 mm trocar, third from the right from the patient's perspective). The duodenum is circumferentially exposed 2-3 cm aboral to the pylorus. The duodenum is then transected with a robotic stapler (Sure Form 60 mm, blue cartridge).

    Caution: Before transecting the duodenum, the gastric tube should be fully withdrawn or at least safely removed from the stomach.

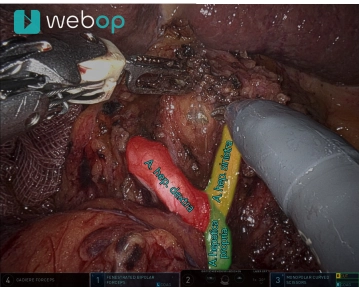
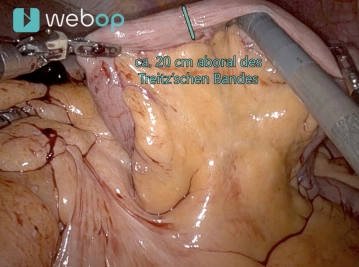
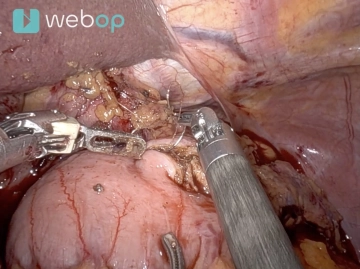
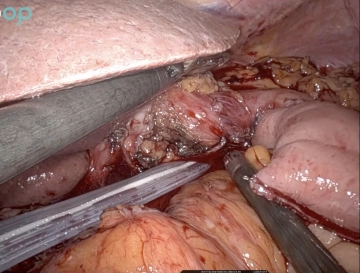
    Switch back to the configuration with two left hands. Now the stomach is placed in the left upper abdomen and the liver is lifted ventrally with the Cadiere. Completion of the lymphadenectomy along the common hepatic artery from the trunk to the origin of the gastroduodenal artery. When the crossing left gastric vein appears, the vessel is clipped centrally twice, peripherally once, and transected.

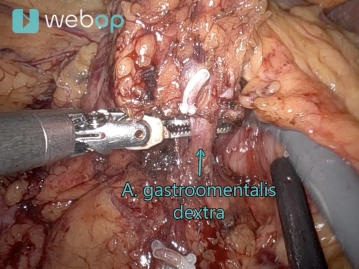
    Then lymphadenectomy is performed along the splenic artery starting at the celiac trunk until the origin of the left gastroepiploic vessels is reached. These vessels remain intact to ensure the blood supply to the remaining stomach. Regardless, lymphadenectomy can be performed up to the splenic hilum. Finally, the origin of the left gastric artery at the trunk is identified, and the vessel is clipped centrally twice and peripherally once with purple Hemoloc® clips and transected.

    Caution: During lymphadenectomy, the pancreatic capsule should remain intact. Otherwise, very troublesome pancreatic fistulas with behavioral situations at the upper edge of the pancreas can occur.

    Note: The management of the left gastric artery is safest and clearest when both the common hepatic artery and the splenic artery are already cleanly dissected.

  10. Skeletonization and Resection of the Oral Remnant Stomach

    Video
    514_10.jpg
    Soundsettings

    Starting at the esophageal hiatus, the lesser curvature of the stomach is freed from vessels and lymph nodes over approximately 4 cm. Subsequently, the omentum is retracted caudally, and the greater curvature is skeletonized while preserving the left gastroepiploic vessels. A very small portion of the omentum, where the short gastric vessels run to the upper pole of the spleen, is left orally. Then, using the 12mm robotic trocar on the far left, the stomach is stapled with usually two green 60mm robotic cartridges. The length of the remnant stomach is approximately 8 cm on the greater curvature and 4 cm on the lesser curvature.

    Note: The indication for subtotal radical oncological gastrectomy is determined by the histological subtype, the grading of the carcinoma, and the localization. For well and moderately differentiated carcinomas of the intestinal type, minimum margins of 5 cm are required; for poorly and undifferentiated carcinomas of the diffuse type and signet ring cell carcinomas, 8 cm.

  11. Retrieval+ Frozen Section Examination of Oral Resection Margins

    Video
    514_11.jpg
    Soundsettings

    Briefly undock the robotic arms from the trocars and retrieve the resected specimen through a Pfannenstiel incision after inserting an abdominal wall protection foil. The specimen is sent for intraoperative frozen section examination (mandatory!) to verify the aforementioned safety margins. Place the cover cap on the protective foil and re-dock the robotic arms for reconstruction.

  12. Verification of Perfusion (ICG), Skeletonization and Resection of the Jejunal Loop, Verification of Perfusion (ICG)

    Video
    514_12.jpg
    Soundsettings

    Now, approximately 20 cm aboral from the ligament of Treitz, a jejunal loop is sparingly skeletonized. This involves the preparation of a small mesenteric window with scissors, incision of the serosa, and further central preparation with the Sessel Sealer. Resection with another robotic stapler 60 mm, blue cartridge. Creation of a mesenteric window in the avascular left-sided transverse mesocolon for retrocolic elevation. Subsequently, the efferent jejunal loop is pulled infracolically into the upper abdomen. Now, using ICG, the perfusion of the gastric remnant and both resected jejunal ends is verified.

    Caution: The skeletonization of the jejunum in minimally invasive surgery is prone to perfusion disorders at the resected jejunal ends, as diaphanoscopy is not possible in contrast to open surgery. Therefore, verification of perfusion in this area using ICG and immunofluorescence is mandatory. Small additional resections (before anastomosis!) are not uncommon.

  13. Gastrojejunostomy and creation of the afferent limb in Roux-en-Y configuration

    Video
    514_13.jpg
    Soundsettings

    Resection of the staple line of the transected stomach over a distance of 4-5 cm and corresponding opening of the elevated jejunal loop antimesenterically. A terminolateral gastrojejunostomy is then performed. Using a double-armed 4/0 Stratafix® RB suture, an initial continuous seromuscular suture line of 4-5 cm is sutured starting at the greater curvature side of the posterior wall. A gastric tube is advanced slightly over the anastomosis into the jejunum. Subsequently, the anterior wall is also sutured extramucosally, seromuscularly, and continuously with the second half of the Stratafix® suture. To prevent mucosal prolapse, a single U-suture is placed using PDS 4/0. Additionally, two more sutures are placed at the corners of the anastomosis to relieve tension from the anastomosis and avoid a dog-ear. The anastomosis is checked for tightness with blue dye, and then the gastric tube is removed.

  14. Creation of the afferent limb in Roux-en-Y configuration

    Video
    514_14.jpg
    Soundsettings

    In a similar manner, the afferent jejunal loop is anastomosed to the efferent loop as a side-to-side jejunostomy approximately 40 cm aborally. The two jejunal loops are opened 4 cm antimesenterically with monopolar scissors. The posterior wall is then sutured using a double-armed 4/0 Stratafix® RB suture in a continuous, seromuscular suture line. Subsequently, the anterior wall is also sutured extramucosally, seromuscularly, and continuously with the second half of the Stratafix® suture.

    Note: This anastomosis can and does not need to be checked for tightness.

    Note: We favor side-to-side enteroanastomoses using robotic seromuscular hand suturing in all areas with serosal bowel segments on both sides and prefer this technique over linear stapler anastomosis. The hand suture is clear, exactly corresponds to the technique in open surgeries, and is, in case of doubt, faster than the stapler suture.

  15. Drain Insertion, Undocking, and Wound Closure

    Video
    514_15.jpg
    Soundsettings

    Lavaging the abdominal cavity and suctioning the irrigation fluid. Insertion of an Easy-Flow drain through the far right trocar (from the patient's perspective) and placement at the gastrojejunostomy.

    Definitive undocking of the robotic arms from the trocars. Removal of the working trocars under direct vision. Fascial closure with 2/0 slowly absorbable monofilament at the site of the two 12mm trocars and the retrieval incision, and skin closure with 4/0 rapidly absorbable monofilament intradermally.

to top