Start your free 3-day trial — no credit card required, full access included

Incisional hernia surgery, laparoscopic with Ventralight™ ST mesh and ECHO PS™ positioning system

  1. Trocar Positioning

    Video
    Trocar Positioning
    Soundsettings

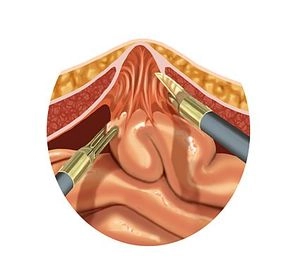
    The pneumoperitoneum is created using a Veress needle placed subcostally on the left. In the mid-abdomen, at the level of the anterior axillary line, the channel for the first trocar is bluntly created. Under diaphanoscopy and laparoscopic control, an additional 5mm trocar is introduced 5 cm cranially and caudally.

    Note 1: The trocars must be introduced into the abdominal cavity outside the future mesh position.

    Note: The initially placed 10mm trocar is later replaced by a 12mm trocar for mesh placement.

  2. Adhesiolysis with Visualization of the Hernial Orifice

    Adhesiolysis with Visualization of the Hernial Orifice
    Soundsettings

    The exploratory laparoscopy reveals a large hernia as well as extensive adhesions in the same area. The adhesiolysis of the small bowel loops and the greater omentum, which are drawn up to the abdominal wall, is now performed step by step with scissors. The hernial orifice can thus be well visualized.

    Tip: The release of adhesions is performed exclusively with scissors without electricity or ultrasound. Only in this way can thermal damage with secondary bowel perforation be avoided. With exclusively sharp dissection, carbon dioxide penetrates the adhesions, thus increasing the distance between adherent structures and the abdominal wall.

  3. Measuring the Mesh Size

    Measuring the Mesh Size
    Soundsettings

    With a needle inserted percutaneously, the edges of the hernia gap are marked and drawn on the anterior abdominal wall. A 17 × 23 cm mesh coated with hyaluronic acid-carboxymethylcellulose is chosen, demonstrated here with an integrated positioning system, to cover the hernia gap sufficiently in all directions, at least 5 cm.

  4. Insertion of the Mesh

    Insertion of the Mesh
    Soundsettings

    First, the upper incision for the camera is expanded to a 10mm trocar, then the middle 10mm trocar is replaced with a 12mm trocar. The mesh is moistened and rolled as tightly as possible on the insertion aid. It is then introduced into the abdominal cavity through the 12mm trocar.

    Note: Alternatively, the trocar can also be removed and the mesh introduced intra-abdominally through its channel.

Positioning of the Mesh

First, the mesh is unrolled, and the hose connection of the inflatable positioning system is pulled

Activate now and continue learning straight away.

Single Access

Activation of this course for 3 days.

US$9.30  inclusive VAT

Most popular offer

webop - Savings Flex

Combine our learning modules flexibly and save up to 50%.

from US$7.19 / module

US$86.28/ yearly payment

price overview

general and visceral surgery

Unlock all courses in this module.

US$14.38 / month

US$172.60 / yearly payment