Start your free 3-day trial — no credit card required, full access included

EndoStim® Stimulation Therapy of the Lower Esophageal Sphincter

  1. Insertion of Trocars and Exploration of the Gastroesophageal Junction

    Video
    Insertion of Trocars and Exploration of the Gastroesophageal Junction
    Soundsettings

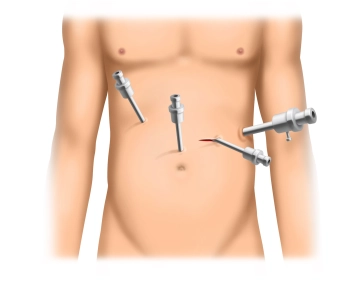
    After a short incision in the left lateral mid-abdomen, access to the abdomen is achieved under visual control using a 12mm disposable trocar with optical function.
    Subsequently, three 5mm trocars are inserted in an arc shape above the umbilical level into the upper or mid-abdomen. An additional 5mm trocar (as in the example) can optionally be placed high epigastrically.

    With a fan-shaped retractor, the left liver lobe is elevated, making the gastroesophageal junction accessible.

  2. Dissection of the Diaphragmatic Crura with Exposure of the Distal Esophagus

    Dissection of the Diaphragmatic Crura with Exposure of the Distal Esophagus
    Soundsettings

    The preparation phase begins with the incision of the lesser omentum in the area of the pars flaccida up to the free edge of the right diaphragmatic crus. The dissection of the right diaphragmatic crus is performed, with the gastroesophageal junction being exposed while preserving the posterior vagal branch. The preparation of the esophagus proceeds along the anterior commissure to the left side. Here, the left diaphragmatic crus is also exposed.

    Note:
    A rectangular longitudinal area of the anterior right distal esophagus about 3 × 1 cm is needed for electrode implantation. If a hiatus repair is omitted, only minimal dissection of the phreno-esophageal attachment should be performed; otherwise, transhiatal mobilization of the distal esophagus is performed.

  3. Insertion of the Probe with Electrodes

    Insertion of the Probe with Electrodes
    Soundsettings

    The bifurcating lead carries a small needle electrode at each end, which is connected to a nylon thread and a needle (Schi needle).
    The entire assembly is now introduced into the abdominal cavity through the 12mm trocar.

  4. Transmural Anchoring of the First Electrode

    Transmural Anchoring of the First Electrode
    Soundsettings

    The implantation of the electrode is performed through a longitudinal incision in the esophageal wall, with the electrode being introduced into the incision channel by gentle traction on the thread. Subsequently, the electrode is secured in the area of the nylon thread with 2 clips.

    Tip:
    It is advisable to perform an intraoperative gastroscopy at this time (during the insertion of the electrodes). On one hand, the height of the Z-line (gastroesophageal junction) can be precisely located, and on the other hand, it can be checked during endoscopy whether the electrodes have not been inadvertently inserted through the mucosa (intraluminally).

    Note:
    To preserve the anterior vagus nerve, the electrode placement is on the anterior right side of the distal esophagus.

  5. Fixation of the Electrode

    Fixation of the Electrode
    Soundsettings

    Next, the proximal end of the electrode is fixed to the esophageal wall with a "butterfly" using 2 sutures.

Transmural Anchoring of the Second Electrode

With a minimum distance of 10 mm from the first electrode, the second is now implanted using the sa

Activate now and continue learning straight away.

Single Access

Activation of this course for 3 days.

US$9.30  inclusive VAT

Most popular offer

webop - Savings Flex

Combine our learning modules flexibly and save up to 50%.

from US$7.19 / module

US$86.33/ yearly payment

price overview

general and visceral surgery

Unlock all courses in this module.

US$14.38 / month

US$172.70 / yearly payment