Toupet Fundoplicatio for GERD, Robot-Assisted

Reading time readingtime 27:57 min.
Activate now
  1. Positioning and Setup

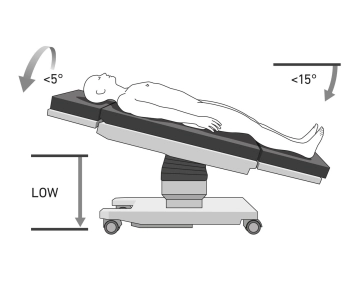
    505_Lagerung.jpeg
    Positioning and Setup 2

    Patient Positioning:

    • Supine position on a large vacuum cushion. The use of the cushion eliminates the need for additional supports
    • Padding for extremities and pressure-prone areas
    • A protective bar is recommended to shield the patient from robotic arms
    • After trocar placement, tilt the operating table to:
      • 15° Anti-Trendelenburg
      • 5° Right tilt (tilt right)
    • The robotic arms are docked to the patient

    Cautions:

    • Ensure secure positioning due to the risk of abdominal wall injuries if the patient slips while docked to the robot
    • Verify the vacuum cushion for leaks before sterile draping

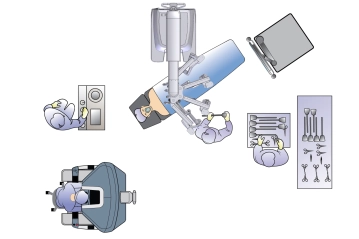
    Setup Details:

    • Surgeon: Operates from the robotic console with visibility of both the patient and the table assistant
    • Table Assistant: Positioned on the patient’s right
    • Anesthesiologist: At the patient’s head
    • Patient Cart: Approaches the patient from the left side
    • Scrub Nurse: Positioned to the right of the table assistant
  2. Pneumoperitoneum, Trocar Placement, and Docking

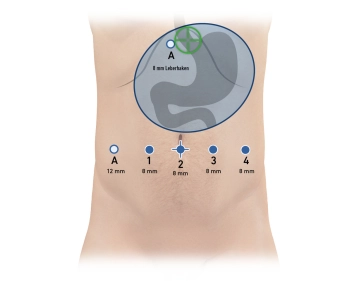
    505_Trokarpositionen.jpeg

    Pneumoperitoneum Creation:

    • Use a Veress needle at Palmer’s Point (left upper abdomen)
    • Establish insufflation and determine optimal trocar positions at the inflated abdomen

    Trocar Placement:

    • Robot Trocar Alignment:
      • All robotic trocars (8 mm) are positioned in a straight line approximately 20 cm below the anticipated target anatomy (using the xiphoid process as a landmark)
      • Maintain an 8 cm distance between trocars to avoid robotic arm collisions
    • Assistant Trocars:
      • One 12 mm trocar on the far-right side, aligned with robotic trocars
      • One 5 mm trocar in the epigastrium for liver retraction

    Docking and Targeting:

    • Place the patient in 15° Anti-Trendelenburg and 5° right tilt positions
    • Approach the Patient Cart from the right cranial side
    • Attach the robotic arms to the trocars
    • Perform targeting and insert instruments under direct vision
    • Park instruments under the anterior abdominal wall

     Instrument Configuration (Patient’s Right to Left):

    • Trocar 1: Fenestrated bipolar forceps
    • Trocar 2: 30° Camera
    • Trocar 3: Monopolar curved scissors, later replaced by vessel sealer extend
    • Trocar 4: Cardiere grasping forceps
    • Assistant Trocar 1 (12 mm, right): Atraumatic grasping forceps, optionally suction
    • Assistant Trocar 2 (5 mm, epigastric): Liver retractor

    Cautions and Recommendations:

    • Remote Control Setup:
      • Position the wide black ring of each trocar at the level of the muscular abdominal wall to minimize shear forces during movement
    • Trocar Inspection:
      • Before starting the operation, inspect the robotic trocars with the camera inserted via the assistant trocar to ensure proper placement
Pre-Docking Checklist

Skin incision in the left upper abdomen, insertion of the Veress needleCreation of pneumoperitoneum

Activate now and continue learning straight away.

Single Access

Activation of this course for 3 days.

US$9.20  inclusive VAT

Most popular offer

webop - Savings Flex

Combine our learning modules flexibly and save up to 50%.

from US$4.25 / module

US$51.07/ yearly payment

price overview

robotics

Unlock all courses in this module.

US$8.51 / month

US$102.20 / yearly payment