
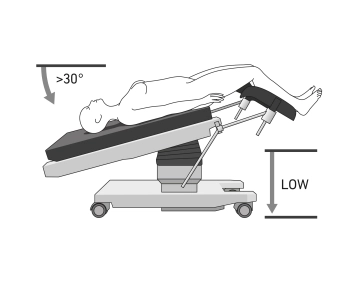
- Positioning is in lithotomy position, ideally on a large vacuum cushion or non-slip mat
- It is recommended to position both arms (caution: cotton wrapping when positioning with a cloth sling), or to position one arm on the assistant's side
- Positioning of the legs in leg holders
- The legs should be adjustable via the operating table control
- If necessary, shoulder supports bilaterally to prevent the patient from slipping on the operating table
- For longer procedures, application of pneumatic compression cuffs for the legs for thrombosis prophylaxis
- If necessary, attachment of a cervical adapter
- Insertion of a urinary bladder catheter
-
Positioning
![Positioning]()
-
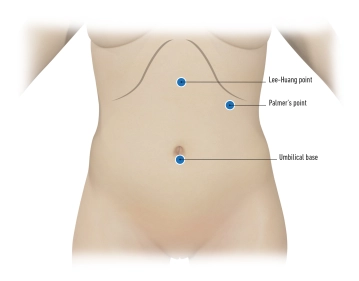
Trocar positioning Palmer's point
![Trocar positioning Palmer's point]()
Soundsettings The trocar placement in the area of the Palmer's point (or Palmer point) is a technique used to minimize the risk of complications by avoiding injury to abdominal organs, especially in patients with previous surgeries or suspected intra-abdominal adhesions. This point is located in the left upper abdomen.
Small puncture incision 2–3 cm below the left costal margin and 1–2 cm medial to the left midclavicular line. Insertion with a Veress needle or a (mini) optical trocar: A Veress needle is inserted through the abdominal wall into the left upper abdomen to create the pneumoperitoneum (CO₂ gas insufflation).
Thus, Palmer's point is an important alternative to the classic umbilical trocar placement and offers a safer access option for certain high-risk patients or when adhesions in the lower abdomen are suspected.
-
Miniature endoscope
Soundsettings Entering with the mini-optic and inspection of the abdomen. The mini-optic provides an initial, less invasive view of the intra-abdominal structures and allows for careful inspection without causing major damage.
Checking for injuries, bleeding, or adhesions, with particular attention to adhesions, as these could complicate the placement of additional trocars.
Positioning of the optical trocar
Based on the findings of the mini-optic inspection, it is decided where the main trocar for the opt
Based on the findings of the mini-optic inspection, it is decided where the main trocar for the opt
Activate now and continue learning straight away.
Single Access
Activation of this course for 3 days.
US$9.10
inclusive VAT
Most popular offer
webop - Savings Flex
Combine our learning modules flexibly and save up to 50%.
from US$4.23 / module
US$50.80/ yearly payment
gynecology
Unlock all courses in this module.
US$8.46
/ month
US$101.60 / yearly payment
Webop is committed to education. That's why we offer all our content at a fair student rate.