
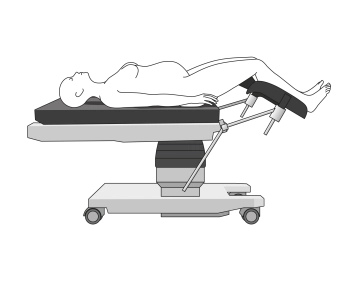
- The patient is positioned in the supine position
- Legs slightly bent:
The legs were slightly bent and the knees supported with a soft pad to ensure a comfortable position and avoid muscle tension. - Arms positioned:
Both arms are extended and padded, which is important for the administration of intravenous medications and fluids. - Head and neck support:
The patient's head was placed on a soft, ergonomic pillow to support the natural curvature of the cervical spine. - Thermoregulation:
To prevent hypothermia, the patient was covered with a warmed cloth or thermal blanket, while the surgical field remained sterilely exposed. - Urinary catheter:
Before the start of the surgery, a transurethral urinary catheter was inserted to empty the bladder and minimize the risk of injury during the uterotomy.
-
Positioning
![Positioning 1]()
![Positioning 2]()
-
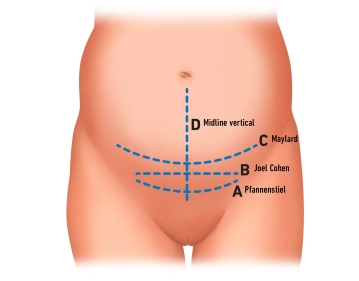
Marking incision line
![Marking incision line]()
Soundsettings After positioning and disinfecting the patient, the planned incision line in the suprapubic region was marked. This typically involved the Pfannenstiel incision, a transverse skin incision approximately 2–3 cm above the symphysis.
The marking is done using a sterile skin marker. With the help of a ruler or scale, the length of the planned incision (approximately 10–15 cm, depending on anatomical conditions) was measured and marked.
-
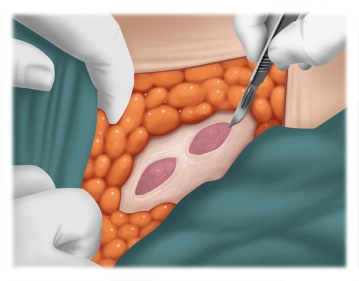
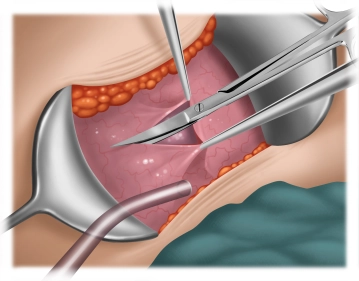
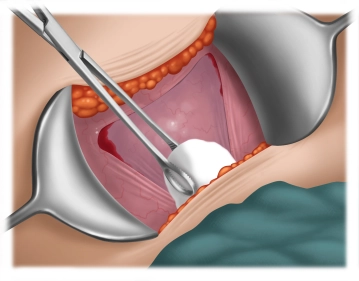
Opening of the abdominal wall
![Opening of the abdominal wall 1]()
![Opening of the abdominal wall 2]()
Soundsettings Skin Incision:
- The skin is incised transversely with a scalpel along the marked line. The depth of the cut is measured so that only the skin is transected.
Subcutaneous Tissue:
- After the skin incision, the underlying subcutaneous tissue is opened centrally over a length of approximately 2-3 cm.
Fascia:
- The underlying fascia is also opened on both sides of the midline over approximately 2 cm.
Now, the subcutaneous tissue and fascia are bluntly expanded laterally, followed by traction in the cranial-caudal direction.
The muscles of the rectus abdominis are bluntly separated (in the midline) to expose the underlying peritoneum.
-
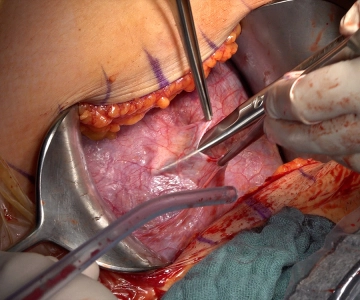
Opening Peritoneum
![Opening Peritoneum]()
Soundsettings Grasp the parietal peritoneum with 2 forceps and sharply open it with scissors.
Alternatively: Blunt dissection with the index finger until a hole is created.
After opening the peritoneum, it is bluntly expanded in a cranio-caudal direction.
Insertion of 2 Fritsch wound hooks and expansion of the access path by lateral traction.
-
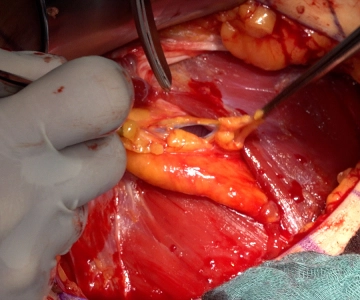
Preparation of the urinary bladder
![Preparation of the urinary bladder 1]()
![Preparation of the urinary bladder 2]()
![Preparation of the urinary bladder 3]()
Soundsettings Grasping the bladder peritoneum (visceral peritoneum) above the bladder reflection fold using 2 forceps. Opening the bladder peritoneum and extending the incision laterally.
Using a swab stick, the separation of the bladder from the uterus is performed.

Uterotomy
After mobilizing the bladder, the lower uterine segment becomes visible. A small transverse incisio
After mobilizing the bladder, the lower uterine segment becomes visible. A small transverse incisio
Activate now and continue learning straight away.
Single Access
Activation of this course for 3 days.
US$9.10
inclusive VAT
Most popular offer
webop - Savings Flex
Combine our learning modules flexibly and save up to 50%.
from US$4.23 / module
US$50.80/ yearly payment
gynecology
Unlock all courses in this module.
US$8.46
/ month
US$101.60 / yearly payment
Webop is committed to education. That's why we offer all our content at a fair student rate.