Start your free 3-day trial — no credit card required, full access included

Myotomy and Fundoplication according to Dor, robotically assisted

Reading time readingtime 40:07 min.
Activate now
  1. Positioning and Setup

    517 Lagerung.jpeg
    517 OP Setup Mytomie nach Heller Leipzig Kopie.jpg

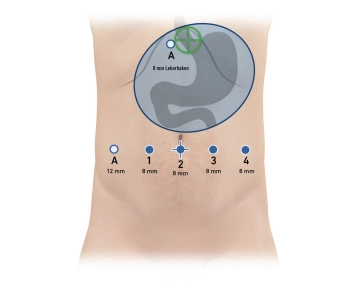
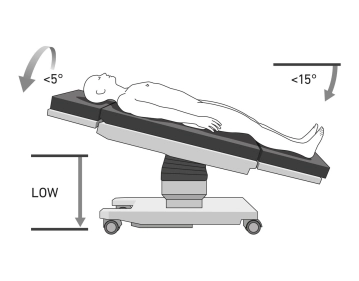
    The patient is positioned in supine position on the large vacuum cushion. The left arm can be positioned outwards. By using the cushion, all further supports are omitted. The extremities and all pressure-sensitive areas are padded. A hoop is recommended to protect the patient from the robot arms. After inserting the trocars, the operating table is tilted to approx. 15°-anti-Trendelenburg and approx. 5°-right lateral position (Tilt right). 

    Caution: The positioning is of particular importance due to the docking of the patient to the robot's manipulator. Risk of injury to the abdominal wall if the patient slips.

    Note: Vacuum cushions can have leaks. Check again before sterile draping.

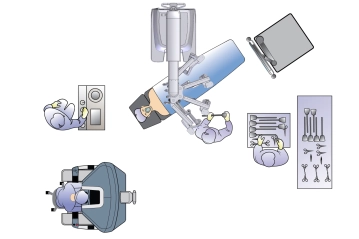
    The following setup is chosen: The surgeon sits at the console ideally also with the possibility to look at the patient and table assistant, the table assistant sits to the left of the patient. The anesthesia is located at the head of the patient. The patient cart is approached from the right cranial to the patient and the instrumenting OR nurse is located to the right of the table assistant

  2. Pneumoperitoneum, Trocar Placement, and Docking

    Video
    517_Trokarpositionen.jpeg
    Soundsettings

    Establishment of a pneumoperitoneum using Veress needle at the Palmer Point in the left upper abdomen. Due to the varying abdominal wall compliance, it is advisable to determine the optimal position of the trocars on the inflated abdomen with pneumoperitoneum. The robotic trocars are located on a line approximately 20 cm below the anticipated target anatomy (xiphoid as landmark)

    The trocars are placed symmetrically with a distance of 8 cm between each. All robotic trocars are 8 mm trocars. Additionally, two assistant trocars are used.

    Tip: Strict attention should be paid to maintaining the distance of 8 cm (hand width) between the Da Vinci trocars to avoid collisions of the robotic arms.

    The patient is placed in 15 degrees anti-Trendelenburg and 5 degrees right lateral position. The patient cart comes from the right cranial side. The arms are connected to the robotic trocars (docked). First, the targeting maneuver (targeting) is performed. Then, the instruments are introduced under visual control and parked under the ventral abdominal wall. Instrument assignment from right to left (from the patient's perspective) Trocar 1: fenestrated bipolar forceps, Trocar 2: camera, Trocar 3: monopolar curved scissors and later vessel sealer extend, Trocar 4: Cardiere grasping forceps, Assistant trocar 1: palpation probe, Assistant trocar 2: atraumatic grasping forceps, if necessary suction

    Caution: The trocars must be positioned with the wide black ring (remote center) at the level of the muscular abdominal wall (so-called remote control) to minimize shear forces in the abdominal wall during movement.

    Note: Ideally, the robotic trocars are inspected with the camera via the assistant trocar when inserting the robotic instruments. This way, the position of all robotic trocars can be easily checked again before the start of the operation.

  3. Checklist before Docking

    o  Stab incision left upper abdomen, insertion of the Veress needle

    o  Pneumoperitoneum

    o  Draw line and points for trocars (each 8 cm apart)

    o  Insertion of the first 8 mm robotic trocar

    o  Insert camera by hand

    o  Insertion of 3 additional Xi trocars

    o  Insertion of the assistant trocar (11mm) far right

    o  Positioning: 15° anti-Trendelenburg, 5° tilt right

    o  Dock camera arm + insert camera (Port 2)

    o  Targeting

    o  Dock 3 additional arms

    o  Arms always a fist's width apart

    o  Insert instruments and introduce into target anatomy (1: Cadiere, 2: Camera, 3: bipolar forceps, 4: monopolar scissors/Vessel sealer

    o  Check the remote center via assistant trocar

    o  Burping

    o   Switch to the console

  4. Tensioning of the Stomach and Incision of the Lesser Omentum

    517_04.jpg
    Soundsettings

    The left lobe of the liver is held up by the Nathanson retractor. The stomach is now tensioned with the Cardiere, thereby also tensioning the lesser omentum. In the area of the pars flaccida, the lesser omentum is incised with the monopolar scissors, so that the right crus of the diaphragm becomes visible.

    Tip: It is recommended to have a thick gastric tube (42 Charriere gastric lavage tube) placed by the anesthesia colleagues under vision.

  5. Preparation of the Diaphragmatic Crura and the Anterior Commissure with Entry into the Mediastinum

    517_05.jpg
    Soundsettings

    After opening the hiatus region, the careful preparation of the right diaphragmatic crus is performed first. This is followed caudally, displaying its fibers up to the insertion into the diaphragmatic pillar. Subsequently, one proceeds over the anterior commissure of the hiatus and displays the left diaphragmatic crus in the same manner. In this process, attention must be paid to a gentle and bloodless dissection, as the preparation occurs in close proximity to important structures.

    Caution: A crucial point in this surgical step is the identification of the anterior vagal trunk. This typically runs in close relation to the anterior wall of the esophagus and can be easily injured during careless preparation. Therefore, it must be securely located at this stage and consistently spared during the entire further procedure.

    In the course of mobilization, the ventral mediastinum is opened. This opening enables further exposure of the distal esophagus as well as sufficient mobility for the subsequent myotomy and fundoplication. At the same time, a particularly gentle approach is required here to avoid compromising vagal fibers and mediastinal vessels

Gottstein-Heller Myotomy

Advancing a 42 Ch gastric lavage probe, Gentle preparation of the cardia region and the distal esop

Activate now and continue learning straight away.

Single Access

Activation of this course for 3 days.

US$9.30  inclusive VAT

Most popular offer

webop - Savings Flex

Combine our learning modules flexibly and save up to 50%.

from US$4.29 / module

US$51.56/ yearly payment

price overview

robotics

Unlock all courses in this module.

US$8.59 / month

US$103.10 / yearly payment