Start your free 3-day trial — no credit card required, full access included

EVAR – Endovascular repair of abdominal aortic aneurysm (Y-graft) – Vascular Surgery

Reading time readingtime 35:33 min.
  1. Exposing the femoral bifurcation, right groin

    Video
    Exposing the femoral bifurcation, right groin
    Soundsettings

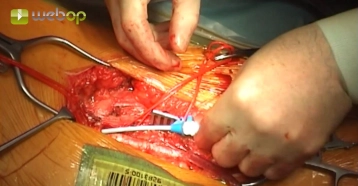
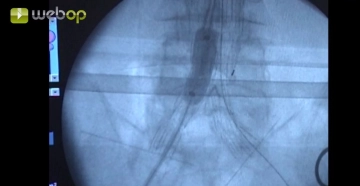
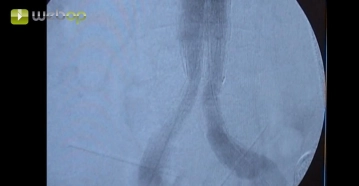
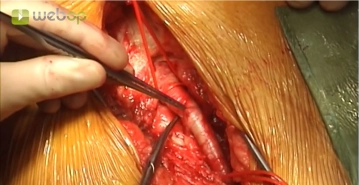
    Approximately 1 cm lateral to the palpated femoral artery make a longitudinal skin incision on the proximal thigh distal to the inguinal aspect. After transecting the subcutaneous tissue, divide the femoral fascia longitudinally medial to the sartorius muscle. Open the fascia of the adductor canal at the distal edge of the incision, expose the superficial femoral artery, and encircle it with a vessel loop. Divide and suture ligate between Overholt forceps the lymph collectors crossing posterior to the inguinal ligament. Encircle the common and deep femoral arteries with vessel loops.

    Repeat these steps to expose the femoral bifurcation in the left groin.

    Tips:

    1. Access lateral to the femoral artery spares the lymph collectors and permits subsequent offset layered closure to promote effective wound healing.

    2. The superficial femoral artery serves as a landmark for proximad dissection lateral to it. This helps to easily locate the deep and common femoral arteries and also avoids the risk of injury to the veins running medially.

    3. Suture ligation of the lymph collectors helps, to a large extent, to prevent subsequent lymphatic cysts and fistulae. Postoperative lymph collection in the groin often paves the way for deep wound infection with fatal consequences.

    4. Lateral and medial circumflex femoral arteries: at times, these arteries are hidden and can bleed profusely if not clamped.

  2. Puncturing the left common femoral artery, introducing a 6F sheath in Seldinger technique and placing a guidewire

    Video
    Puncturing the left common femoral artery, introducing a 6F sheath in Seldinger technique and placing a guidewire
    Soundsettings

    Puncture the left common femoral artery with an 18G needle and insert a 6F sheath in Seldinger technique. Administer 5000 IU heparin saline locally into the vessel. Under fluoroscopy, insert a guidewire with hydrophilic coating (here: Terumo®) into the descending aorta.

    Tip:

    In case of marked coiling, this may require steering with a curved guiding catheter.

  3. 3. Puncturing the right common femoral artery, introducing a 6F sheath in Seldinger technique and placing a guidewire

    Video
    3. Puncturing the right common femoral artery, introducing a 6F sheath in Seldinger technique and placing a guidewire
    Soundsettings

    Repeat surgical step 2 for the right groin.

  4. Inserting a pigtail catheter on the left, extracorporal marking of renal artery level

    Video
    Inserting a pigtail catheter on the left, extracorporal marking of renal artery level
    Soundsettings

    Now introduce a graduated pigtail catheter via the indwelling guidewire on the left. Perform angiography with a high pressure injector to identify the renal artery level, which is marked extracorporeally with a needle for rough orientation.

  5. Peripheral marking/origin of both internal iliac arteries

    Video
    Peripheral marking/origin of both internal iliac arteries
    Soundsettings

    After repeat injection of contrast medium, mark the origins of both internal iliac arteries extracorporeally with a needle each.

    Tip:

    By marking extracorporeally the renal artery level and the origins of both internal iliac arteries, respectively, it is possible to decrease the dose of contrast medium applied. However, do not rely blindly on the markings, as the abdominal aorta may elongate after introduction of the stiff graft delivery system, resulting in displacement of the anatomical landmarks

  6. Switching the pigtail catheter from left to right, inserting a stiff guidewire into the thoracic aorta

    Video
    Switching the pigtail catheter from left to right, inserting a stiff guidewire into the thoracic aorta
    Soundsettings

    Switch the pigtail catheter from left to right. With the pigtail catheter in place in the right groin, now advance a stiff guidewire (here: Lunderquist®, or alternatively Amplatz® or back-up Meier® catheters) under fluoroscopy into the thoracic aorta. Switch the pigtail catheter bacl to the left groin and advance it into the suprarenal aortic segment.

  7. Preparing the main body

    Video
    Preparing the main body
    Soundsettings

    Prepare the delivery system of the main body for implantation, which will require different steps depending on the type of graft and its manufacturer. In the video example, the plastic tabs protecting the chamber system are removed. Next, the chamber is filled with heparin-saline solution and the delivery system is moistened, making the system coating slippery.

  8. Introducing the main body via the right groin

    Video
    Introducing the main body via the right groin
    Soundsettings

    Position the vascular graft extracorporeally by fluoroscopy in the previously prepared roadmapping mask and check the graft dimensions again.  Remove the 6F sheath on the right and advance the delivery system with the main body of the graft slowly and carefully over the stiff guide wire. Advance the delivery system to above the level of the renal artery. The markers of the inserted main body in the central section indicate the transition from the uncovered ("bare") to the covered part of the graft. Before deploying the graft by turning the handle of the delivery system, perform additional angiography to precisely locate the origins of the renal arteries. Only partly deploy the graft infrarenally so that the position of the graft can be corrected in case as malposition.

    Introduce a guide wire with hydrophilic coating (Terumo®) transfemorally from the left to probe the free left limb of the graft. Check its correct position by rotating a pigtail catheter introduced over the Terumo® guide wire. If the graft is positioned correctly, deploy the central uncovered segment of the graft. Verify the correct position of the graft by repeat angiography.

    Tips:

    1. The delivery system must be introduced delicately to ensure that the olive at the tip of the system can gently dilate and pass through the access artery. To this end, grasp system close to the sheath so that it does not kink when advancing it.

    2. Careful positioning of the graft is vital to ensure that the covered segment of the graft does not inadvertently occlude the origins of the renal arteries. Position the uncovered segment suprarenally and the covered segment infrarenally.

    3. Probing the contralateral limb of the graft (on the left in the video) can quite very difficult at times and can only be accomplished with special guide wires. In cases of pronounced elongation of the iliac arteries and eccentric aneurysm shapes, it is therefore sometimes advisable to aim primarily for a "cross-leg ballerina configuration" (see Perioperative Management, "Planning" Figure 4).

    4. Roadmapping („Pathfinder“): This involves the administration a small bolus of contrast agent to visualize the abdominal aorta as a roadmap. This image is saved as a mask. Subsequent images are then acquired without contrast media and subtracted from the mask. In this way, for example, only the current position of a radiopaque catheter will be displayed. In the resulting subtraction images, the bright catheter will be visible against the dark background of the abdominal aorta, and any background irrelevant to this study is omitted.


  9. Extending the iliac graft limb, left

    Video
    Extending the iliac graft limb, left
    Soundsettings

    Prepare the delivery system of the left graft limb extension in the same way as for the main body (see surgical step 7). Replace the left Terumo® wire transfemorally with a stiff guidewire via the indwelling pigtail catheter and advance the delivery system for the extension of the graft limb. Both grafts (main body and iliac extension) should overlap by at least 2 cm. Here, too, the radiopaque markers on the prosthesis are helpful.

    With the shaft of the main body delivery system (transfemoral right), pick up the central olive and then remove the inner part of the delivery system on the right. For now, leave the outer shaft, which is designed like a sheath, in the iliac artery, as this will be used for the graft extension on the right side in the next step of this procedure.

    Tip:

    Adequate graft module overlap of at least 2 cm can significantly reduce the risk of migration and thus the presence of type I endoleaks.

  10. Extending the iliac graft limb, right

    Video
    Extending the iliac graft limb, right
    Soundsettings

    Advance another delivery system for graft limb extension to the pelvic level via the sheath still indwelling in the right groin Here, too, ensure adequate graft overlap.

  11. Molding the graft modules

    Video
    Molding the graft modules
    Soundsettings

    Introduce a soft balloon catheter through both sheaths to mold the central graft body, the overlap zones of the graft extensions, and their peripheral segments to the vessel wall.

    Caution:

    Dilate only the covered infrarenal segment of the central graft. Do not dilate the suprarenal segment under any circumstances, as this may induce perforations!

  12. Verification angiography

    Video
    Verification angiography
    Soundsettings

    At the end of the procedure, perform verification angiography via a pigtail catheter advanced to the suprarenal level: The origins of the renal arteries are patent and the pelvic run-off is unremarkable. Left lumbar artery L4 is the site of a discrete type II endoleak.

    Removal of the sheaths and catheteters, close the arteriotomies and close the inguinal wounds in offset layers after placing Redon drains (not illustrated in the video clip).

    Tips:

    1. In the verification angiography look for the following: Position of central graft in terms of renal artery patency, peripheral graft in terms of iliac artery patency, possible endoleak (if so, which type?).

    2. Endoleaks: see Complications